
Create a project
Stages to create a project. It is available to set basic project information and labeling.
Click the 'Create Project' button in the project list and move to the screen for creating a project.
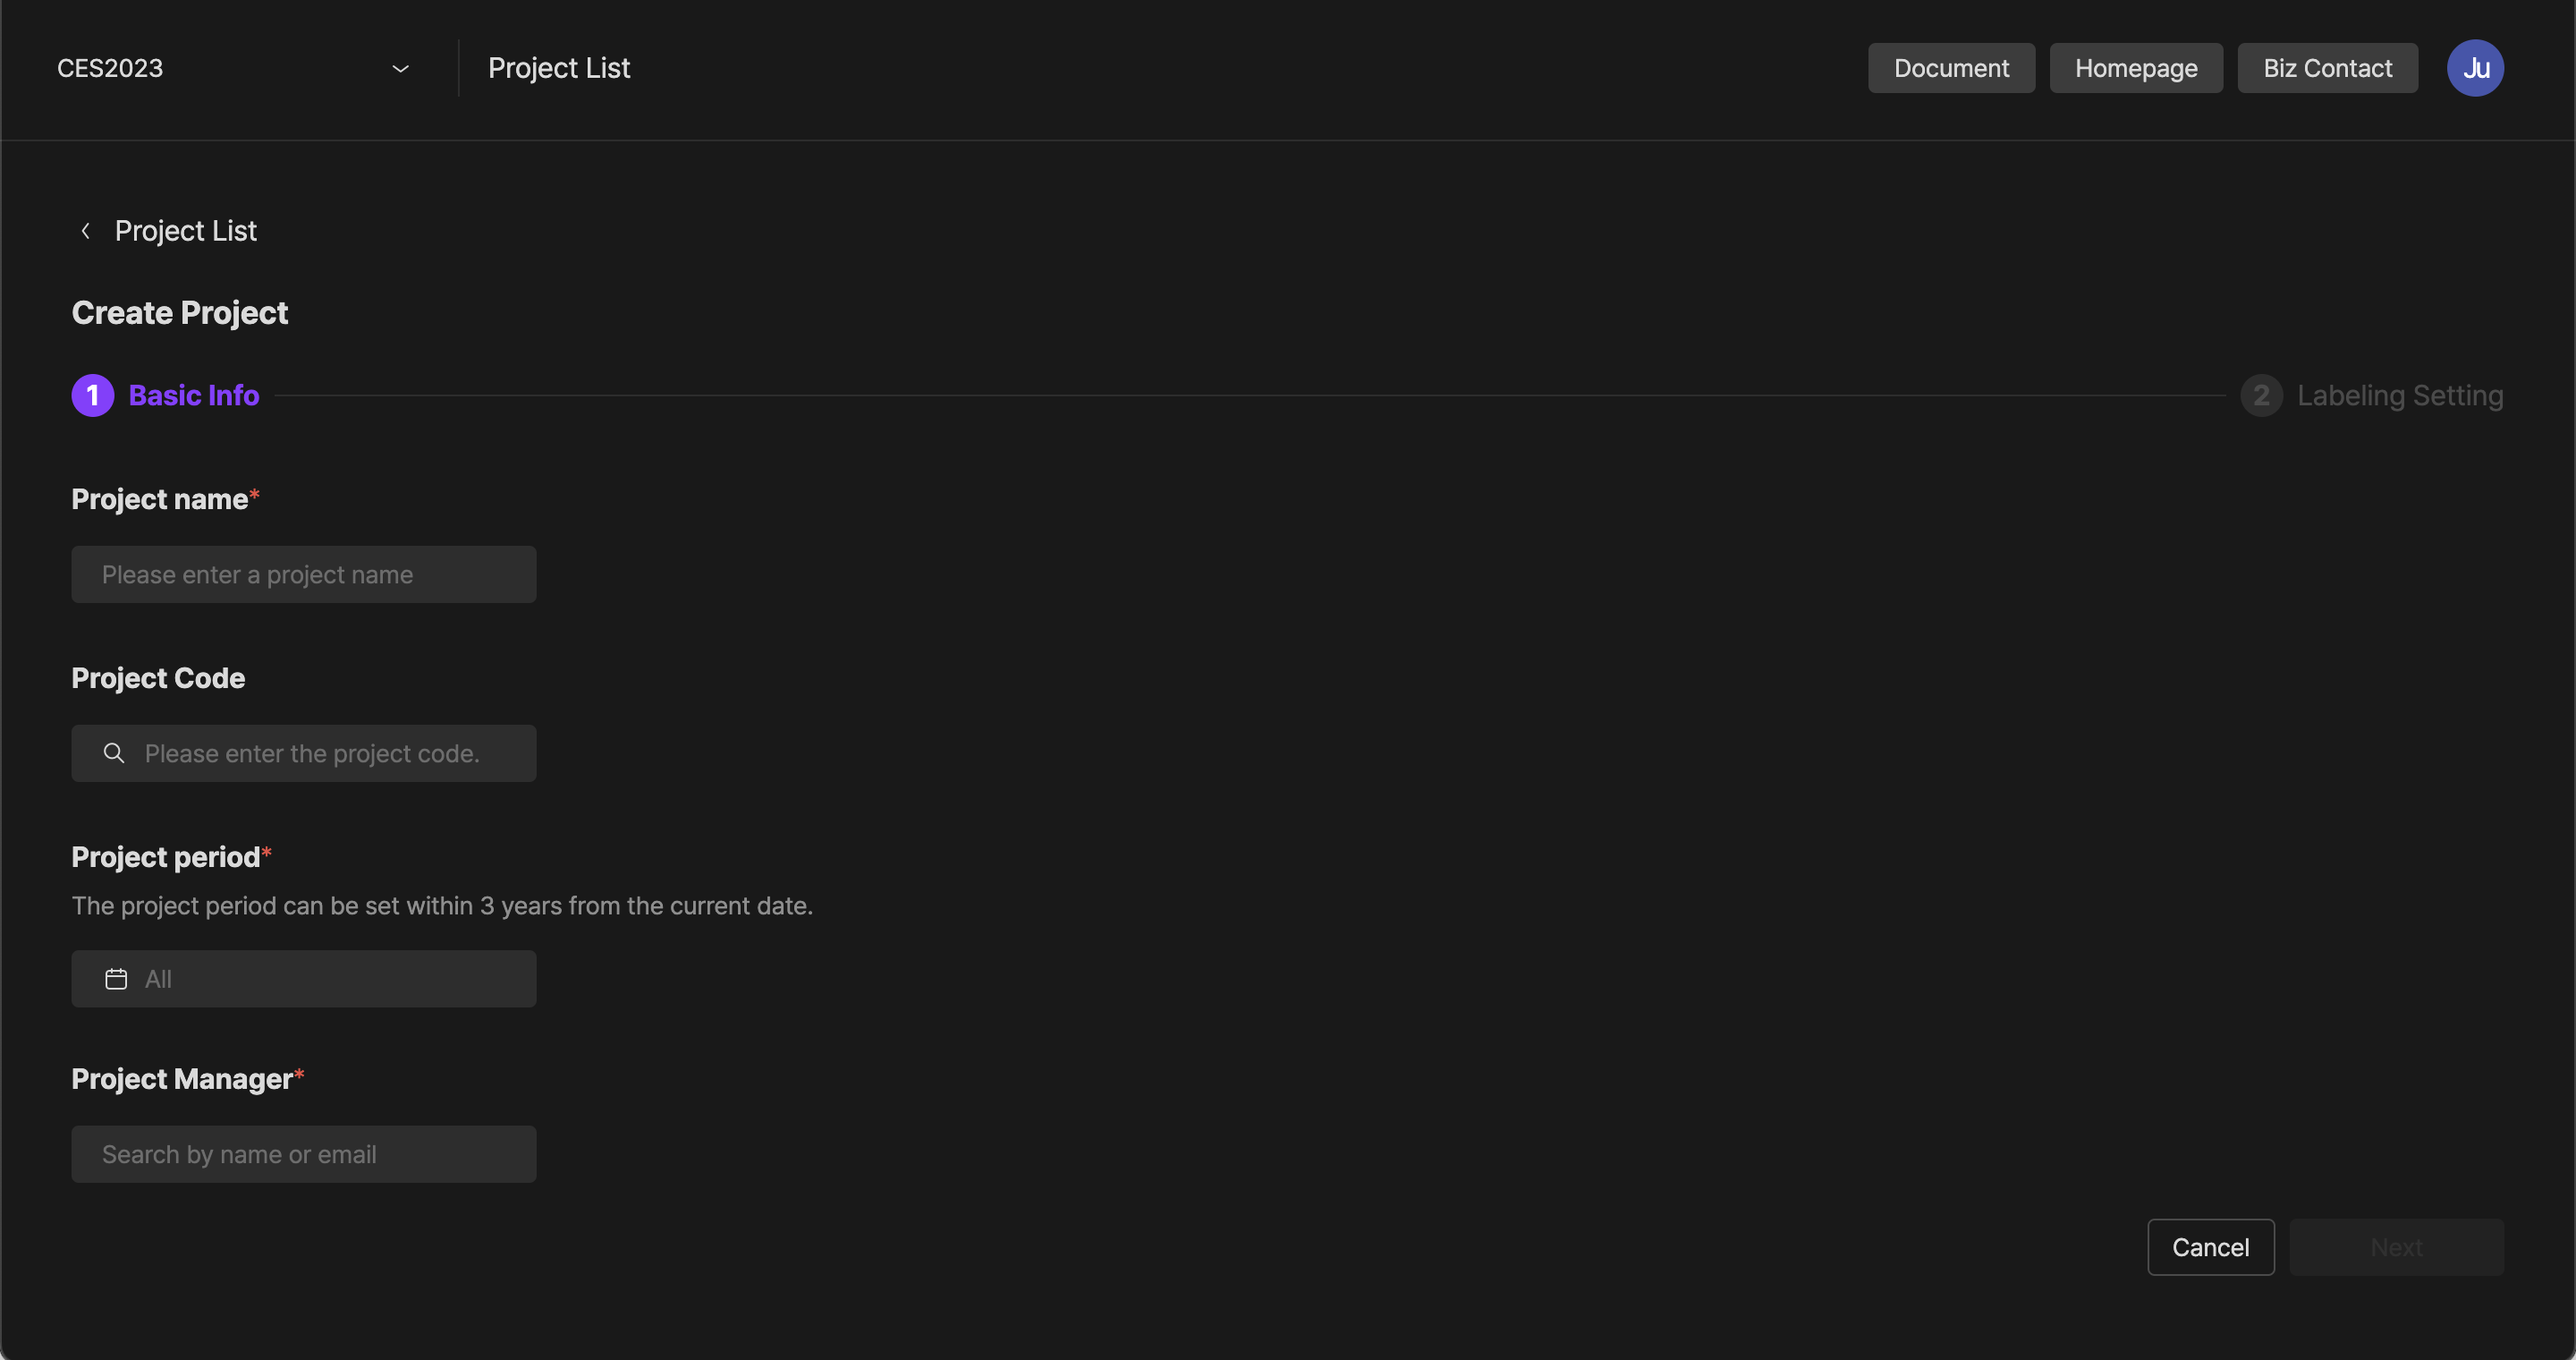
Stage 1: Basic Information
Stage 1 of project creation is basic information settings.
Set the project name, duration, and PL
- Project Name
: Enter a project name. Project names can be duplicated.
- Project Duration
: Set the duration of the project. The project duration can be set to within three years from the current date.
- Project PL
: Set up a project PL (Manager). You can add workspace users who have the authority of owner or manager
create project > basic info
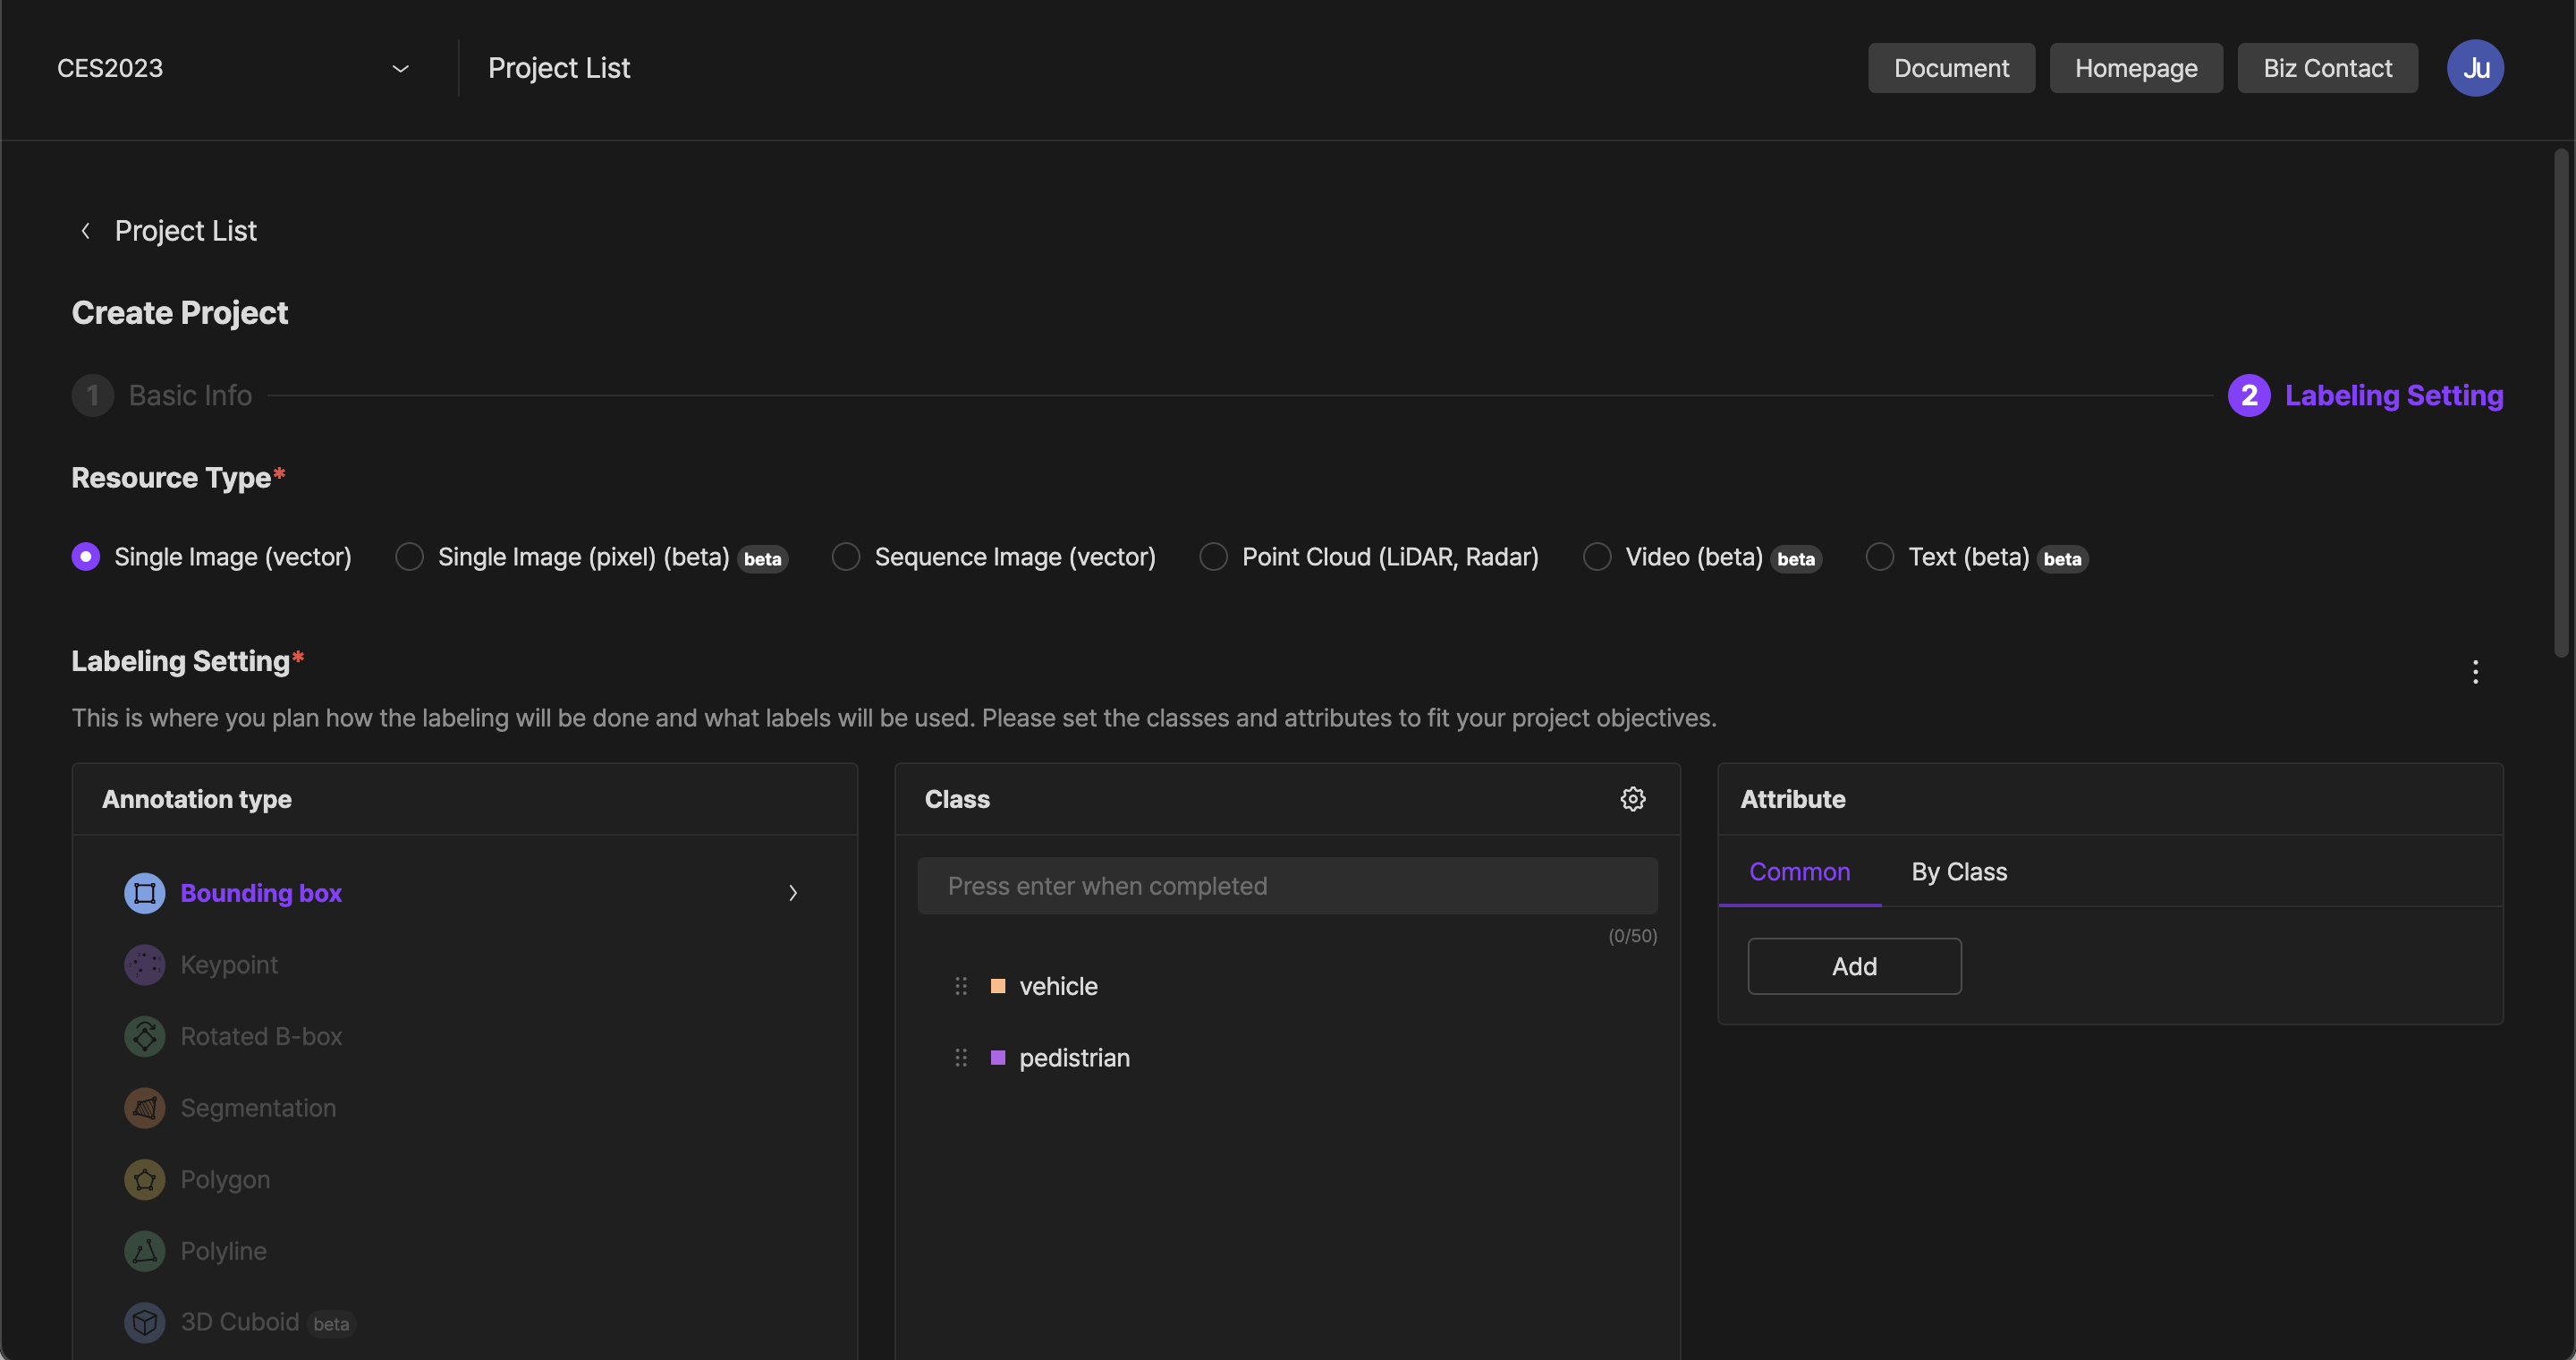
Stage 2: Labeling settings
Stage 2 of project creation is labeling setting
In labeling settings, it is available to enter the desired labeling type, task type, class, and attribute values.
[Resource Type]
Set the resource type based on the data type for the task.
It is available to choose one of the following six resource types.
- Single Image
- Single Image(Segmentation)
- Sequence Image
- Point Cloud(LiDAR)
- Video
- Text

[Task Settings]
The setting stage for the labels and method for working data.
Set the task type, class, and attributes that meet project objectives.
Task type
Depending on the type of project you selected, the items in the task types that can be chosen may vary.
The characteristics of each task type can be found in [Project Task Type].
| Task data type | Labeling type |
|---|---|
| Single/Sequence Image(Vector) | - Bounding Box - Rotated B-box - Keypoint - Segmentation - Polygon - Polyline - (Beta)3D Cuboid |
| Single Image(Pixel) | - (Beta)Segmentation |
| Point Clouds(LiDAR, RADAR) | - LiDAR 3D Cuboid - (Beta)Segmentation |
| (Beta)Video | - (Beta)Frame Range |
| (Beta)Text | - (Beta)Entity |
Class
You can set classes by task type.
After selecting the task type, put the class name in the activated class input box and press Enter to add it.
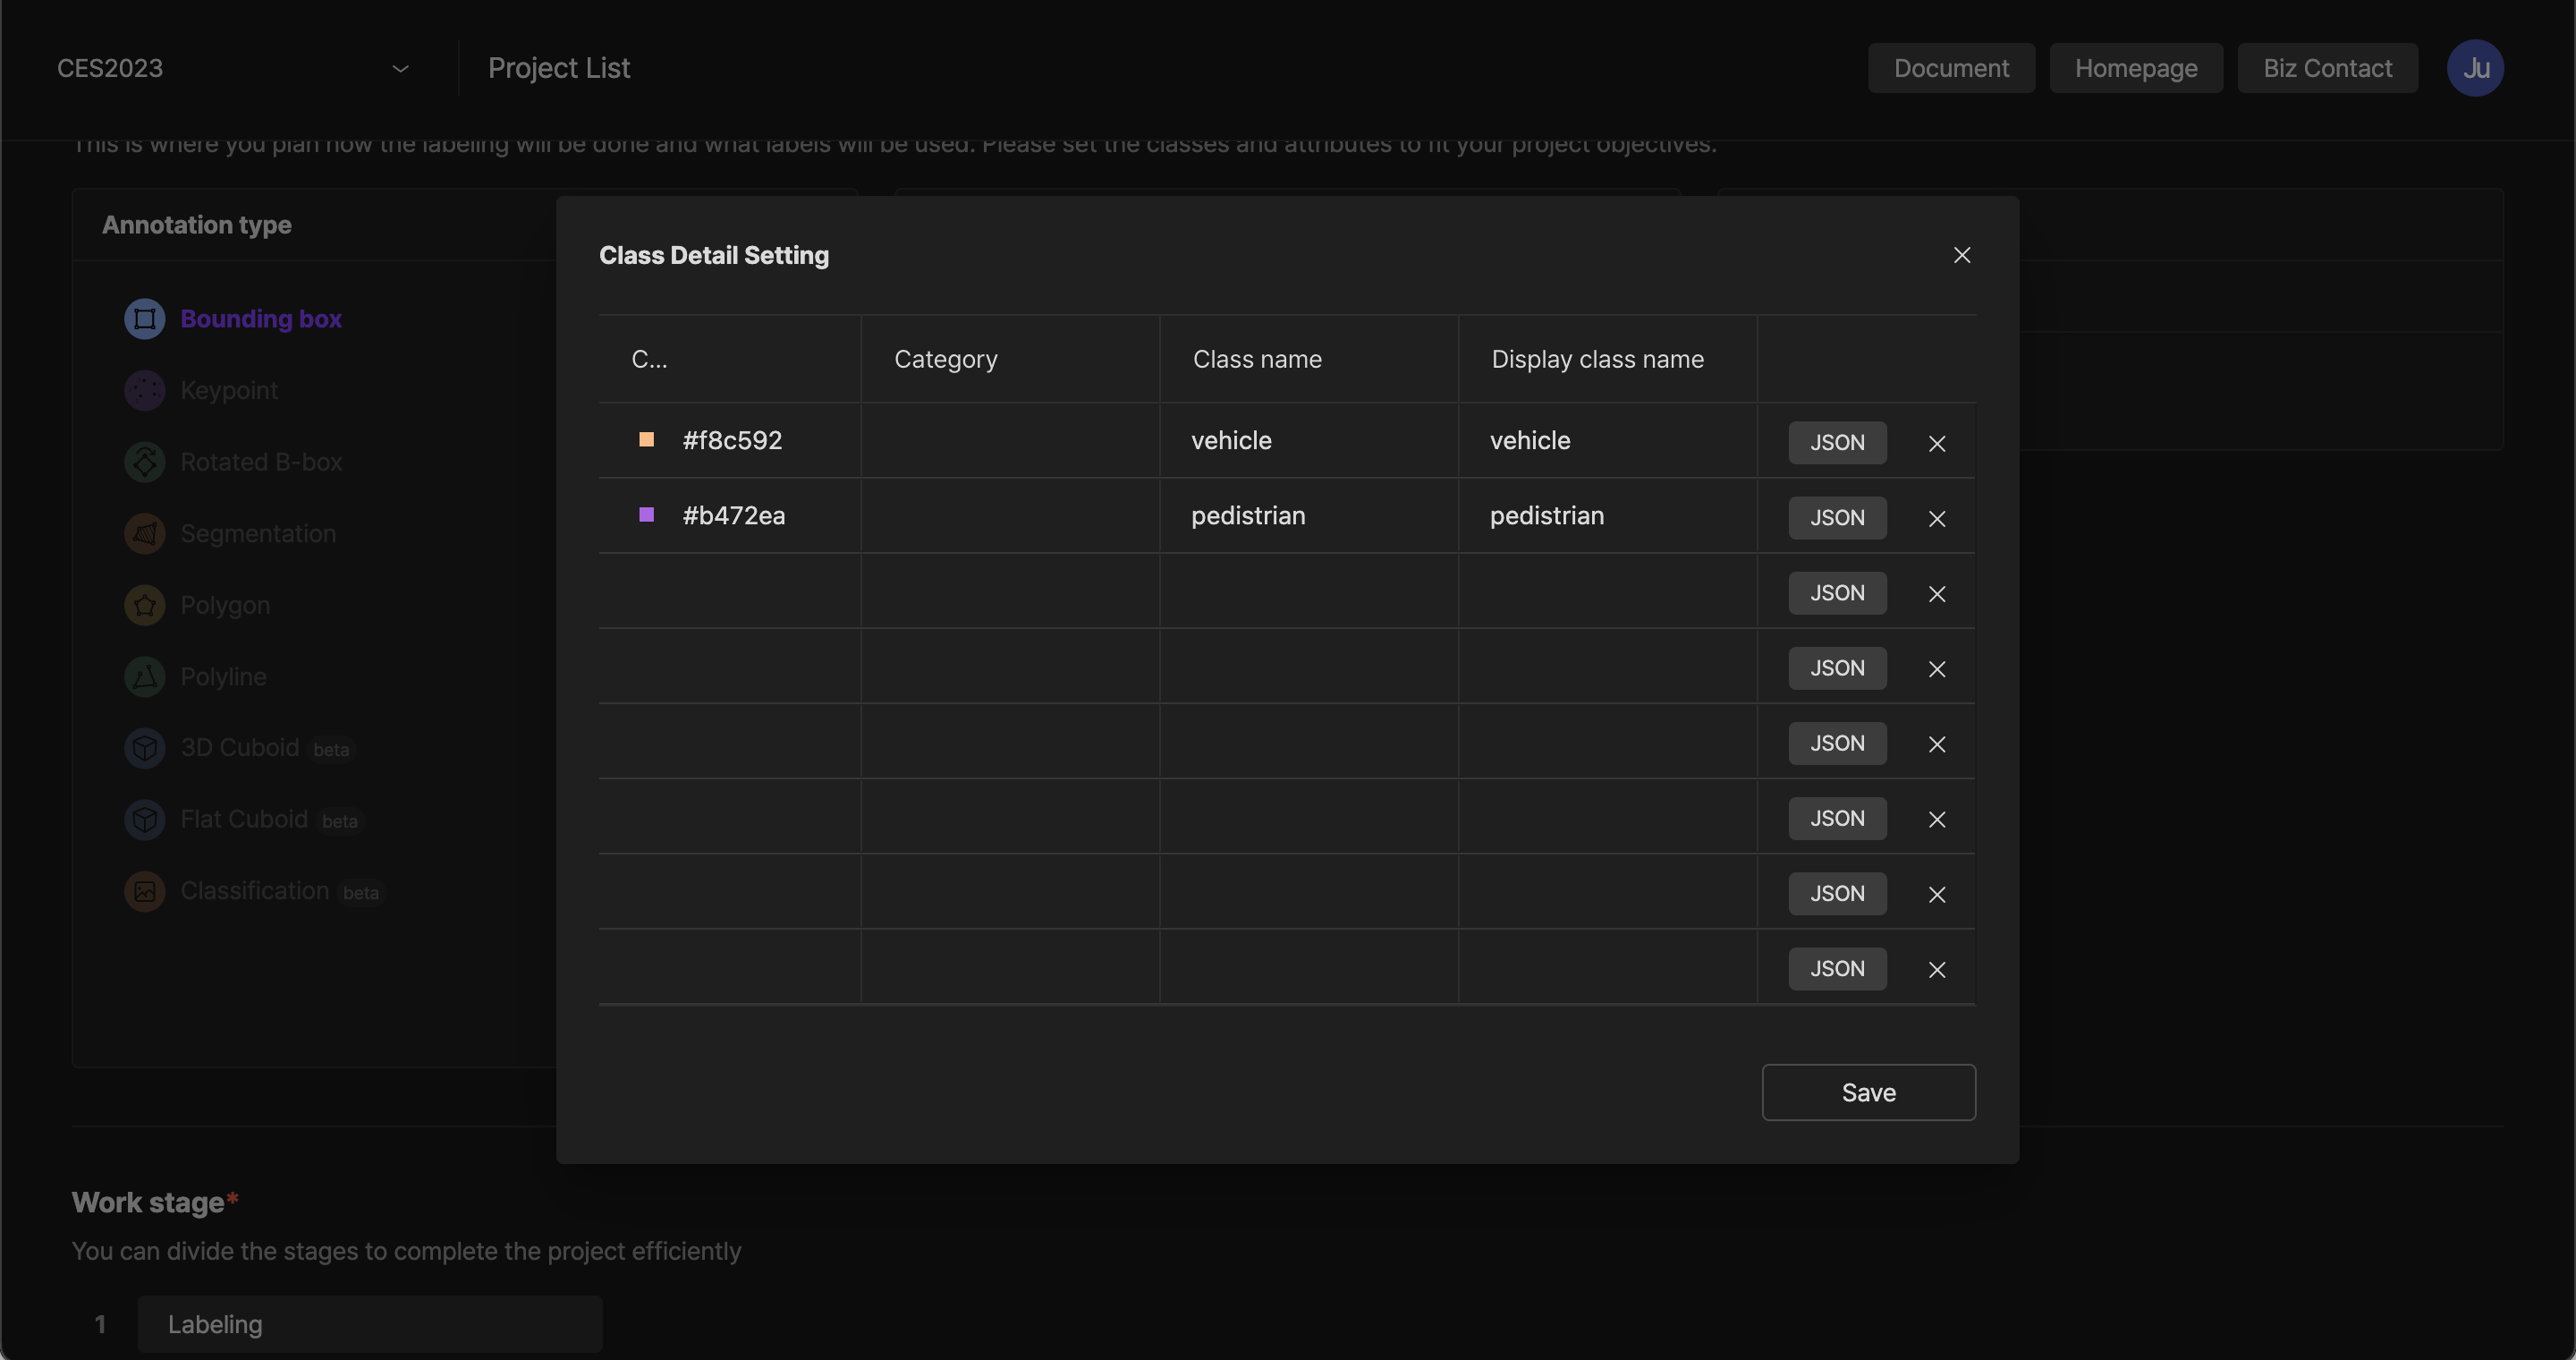
Class detailed settings
Click the class settings button to check the class detailed settings window. It is possible to modify the color and category of the class, the class name, and the class name to display.
- By clicking the
JSON button, it is available to use the JSON input CLI. - It is available to copy and paste a table from Excel or Google Sheets.
- It is possible to delete a class by hovering over the class that wants to delete and clicking the right
Xbutton.
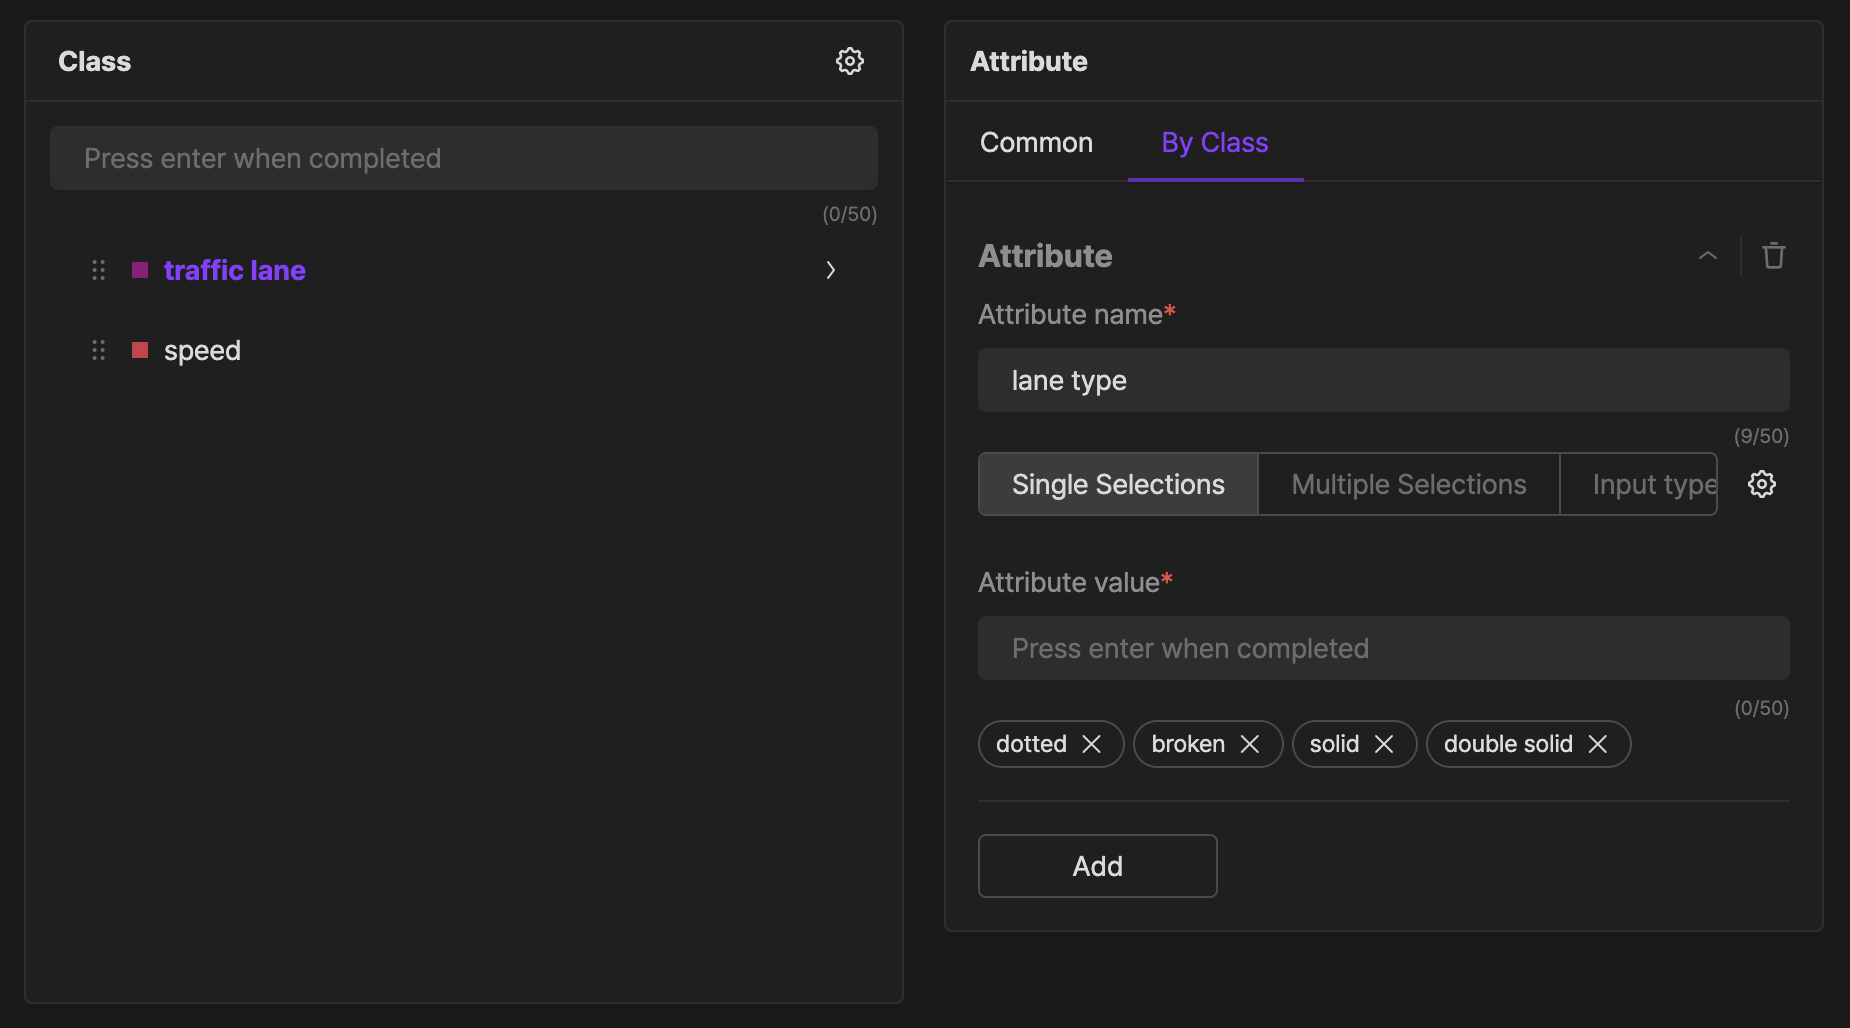
Attributes
t Is possible to set sub-properties of the class and you can freely add and delete them.
If there is no set value, only labeling with class information.
Target to apply attribute
- Common attributes: Enter attribute values that will be applied to all classes in common.
- Attributes by class: Enter attribute values that apply only to the selected class.
For example, if you want to distinguish the color, model, and size of a car on the road,
you need to enter the Car for Class and Color, Model, and Size for the attribute name.
And enter the large, medium, and small values as attribute values corresponding to the various values of the size.
Method to enter attributes
Attributes can be entered in the following three ways, and you can check the detailed attribute setting window according to the entering method.
- Single-selective: When labeling, select only one of the attributes that are set under the class.
- Multi-selective: When labeling, it is available to select multiple attributes that are set under the class. It is possible to set the minimum and the maximum number of choices.
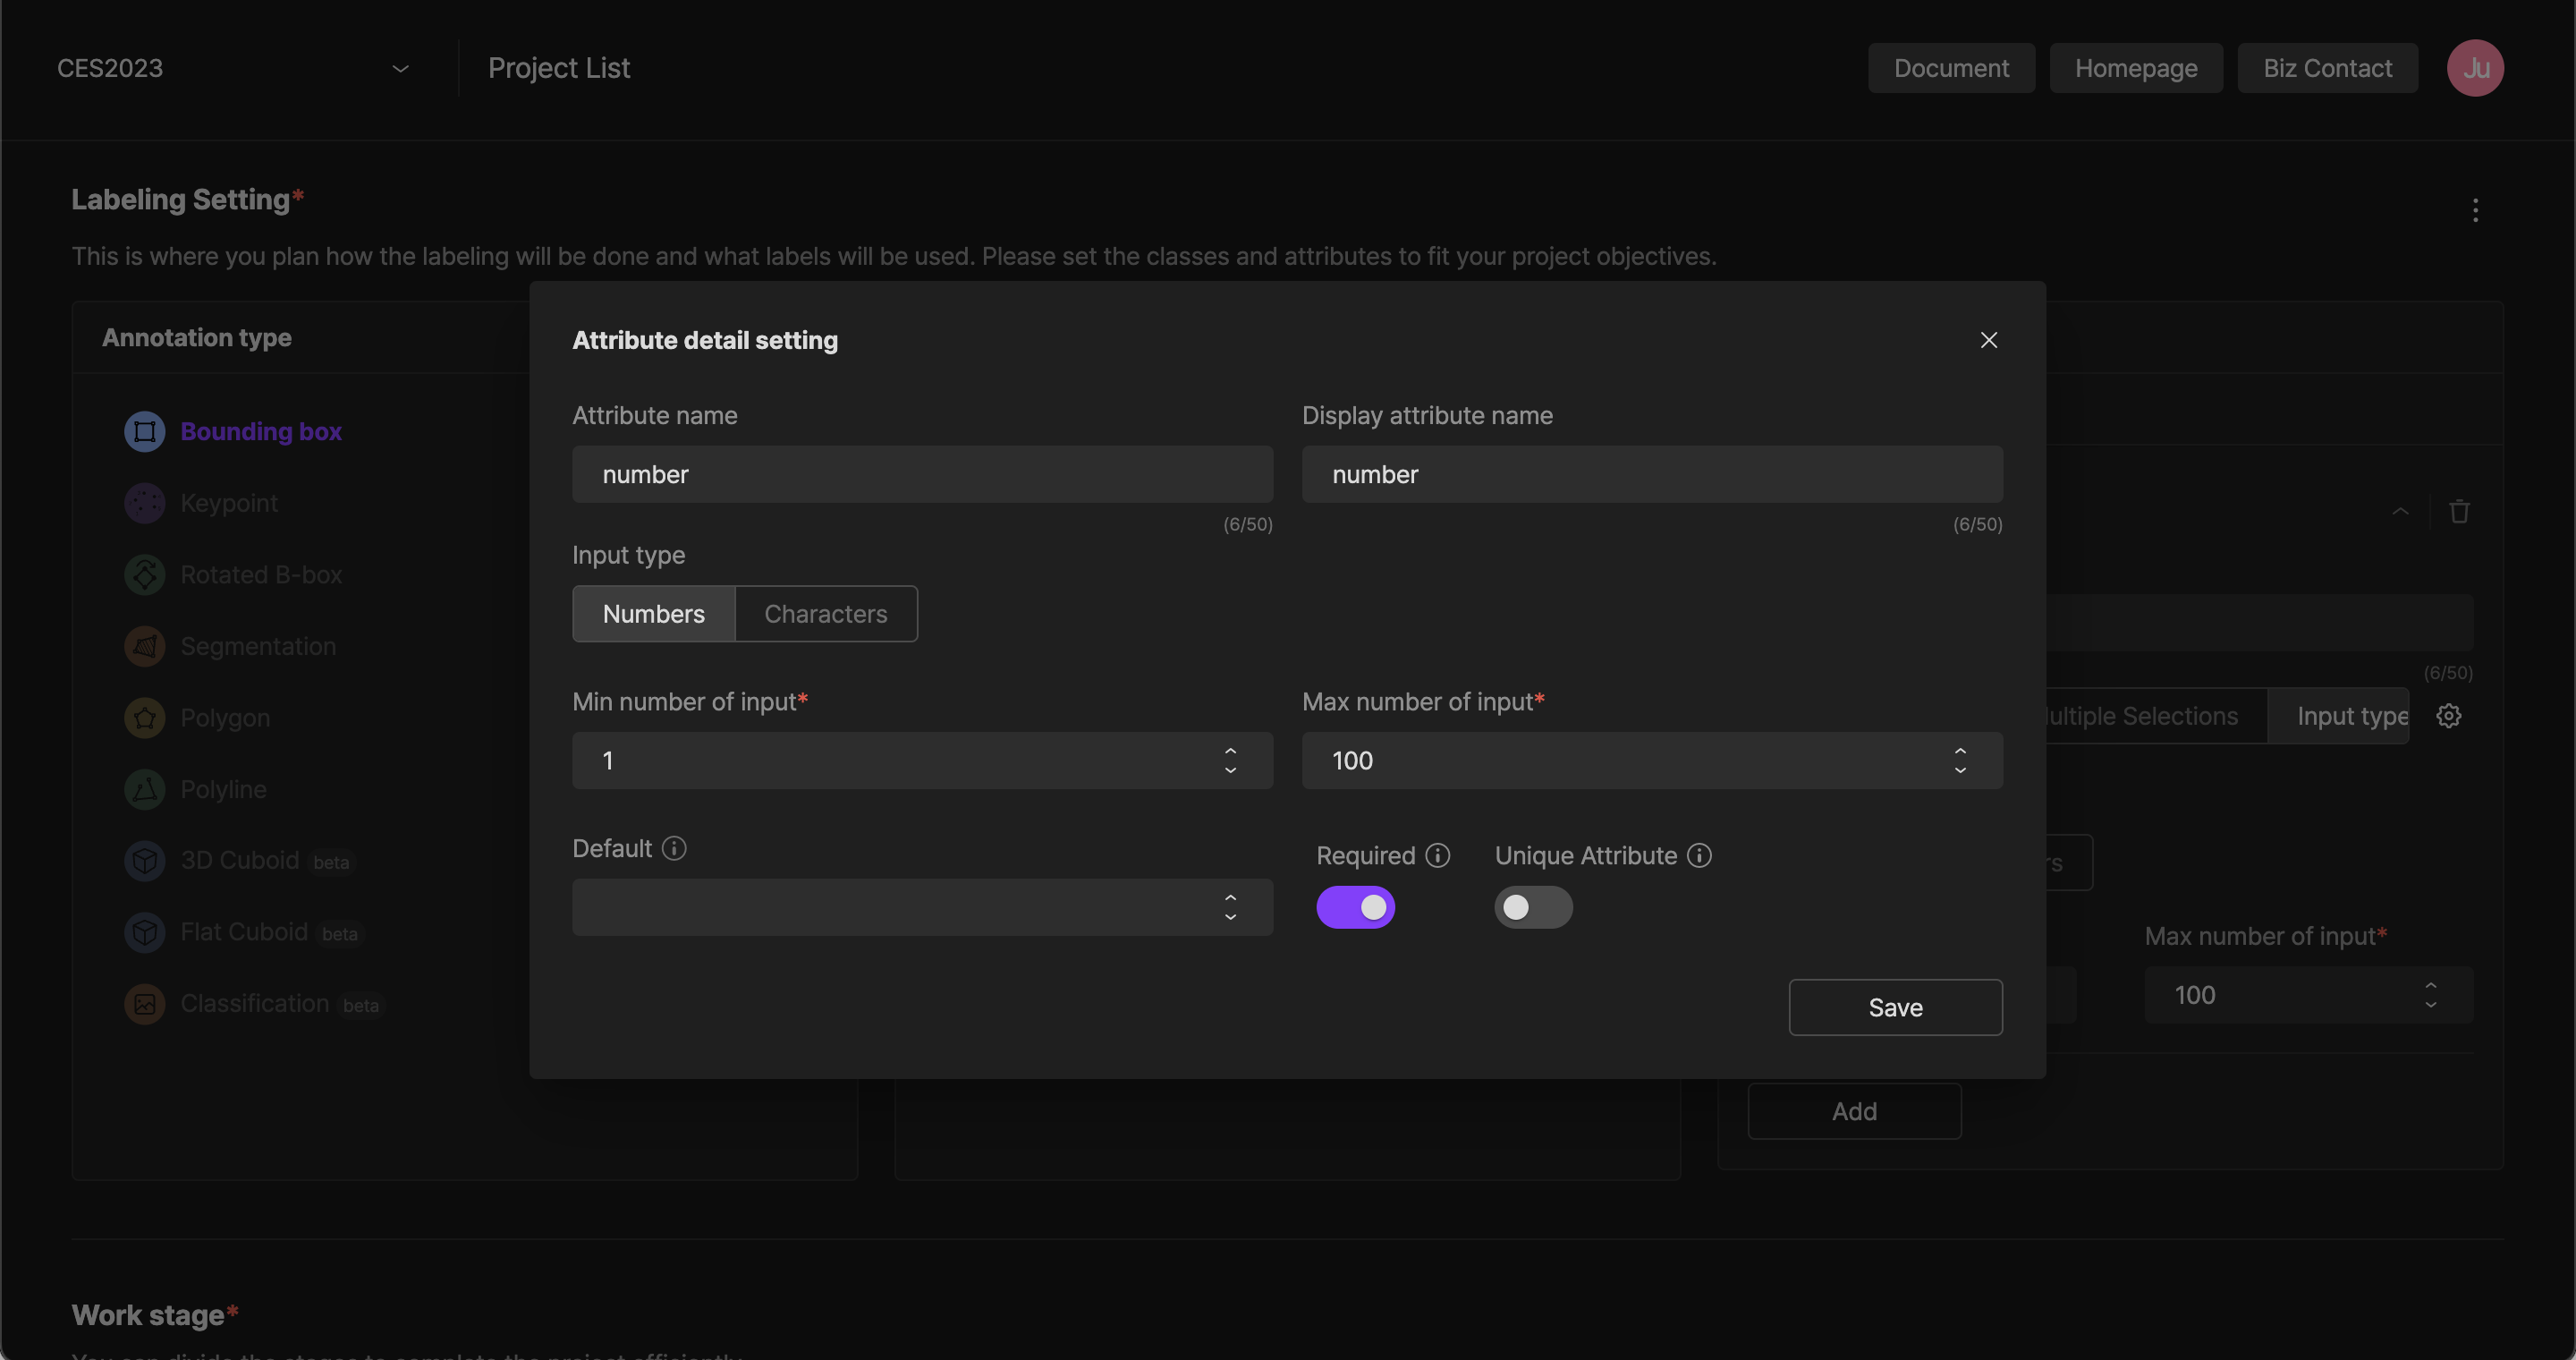
- Entering type: The labeler directly determines and enters the attribute so that the entering type can be selected between numbers and letters.
When you select a numeric input, you can set the minimum and maximum input values. When selecting text Input, you can set the minimum number of characters and the maximum number of characters that can be entered.
Single-selective
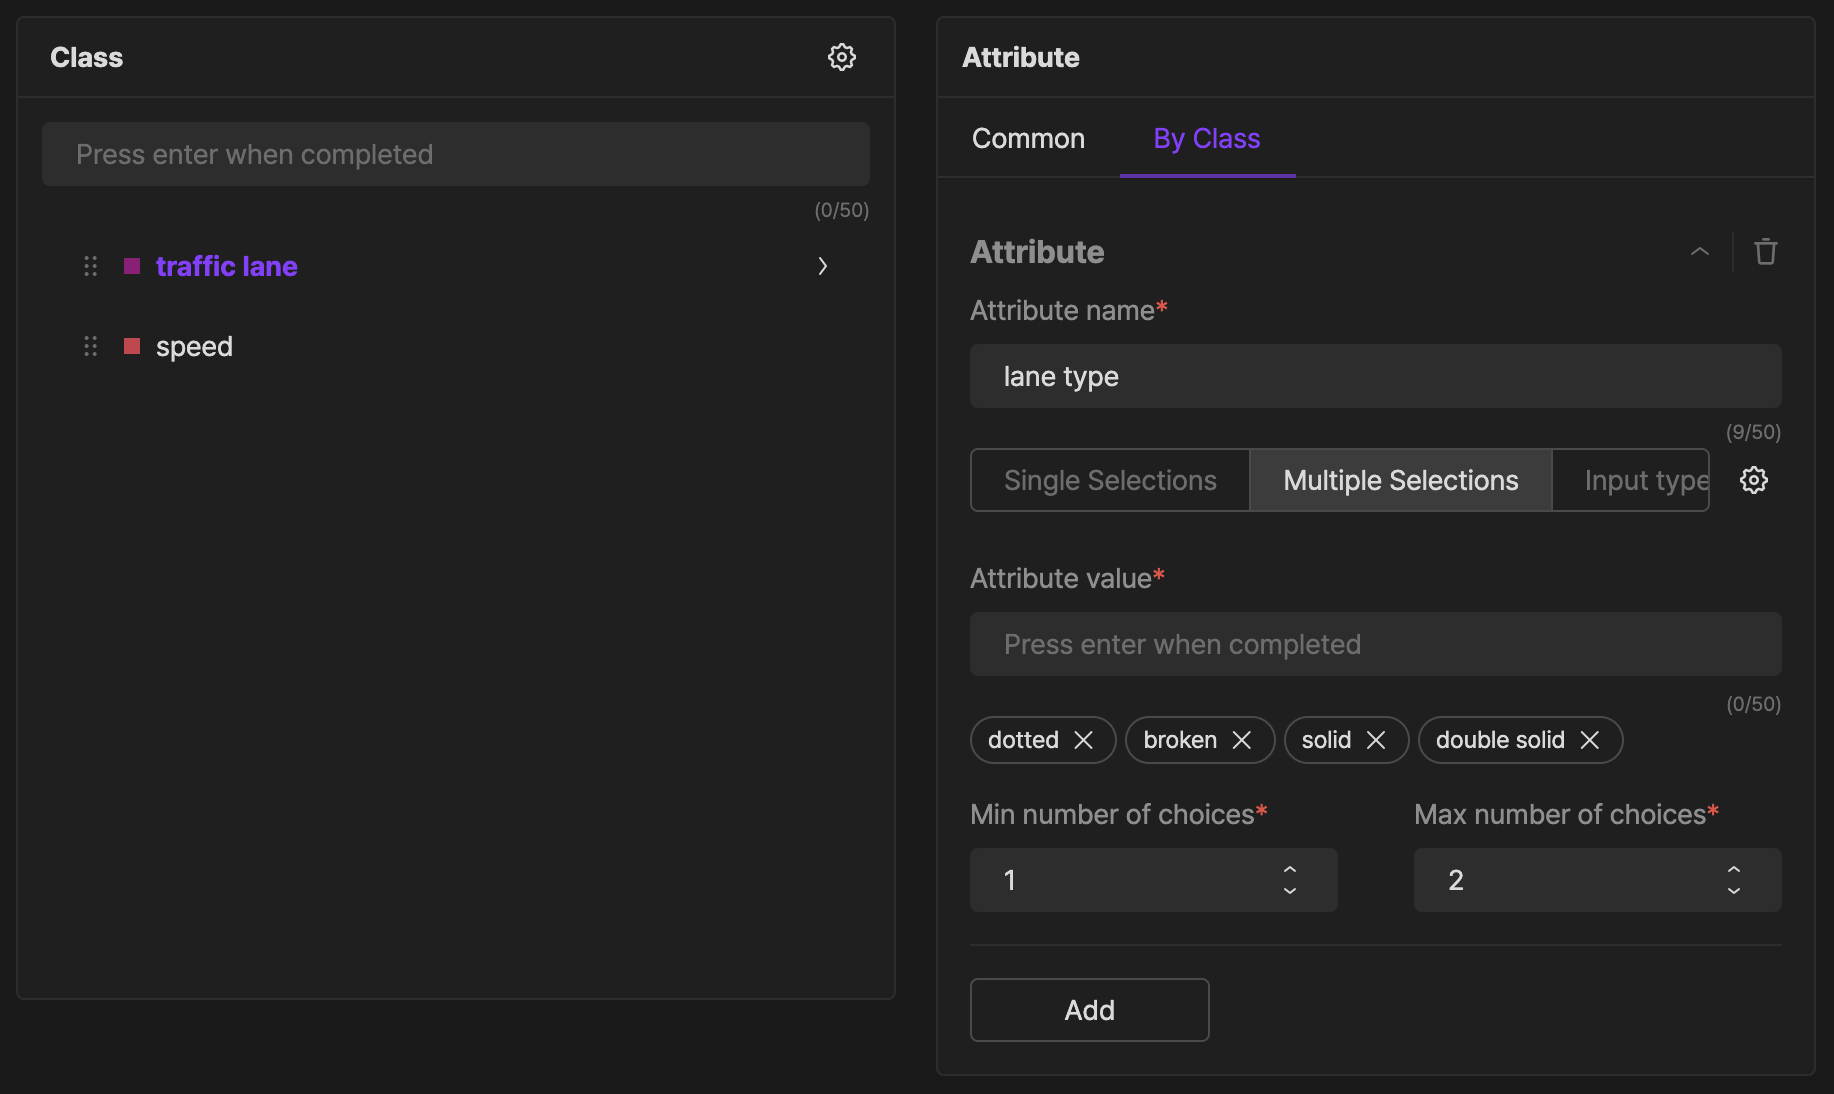
Multi-selective
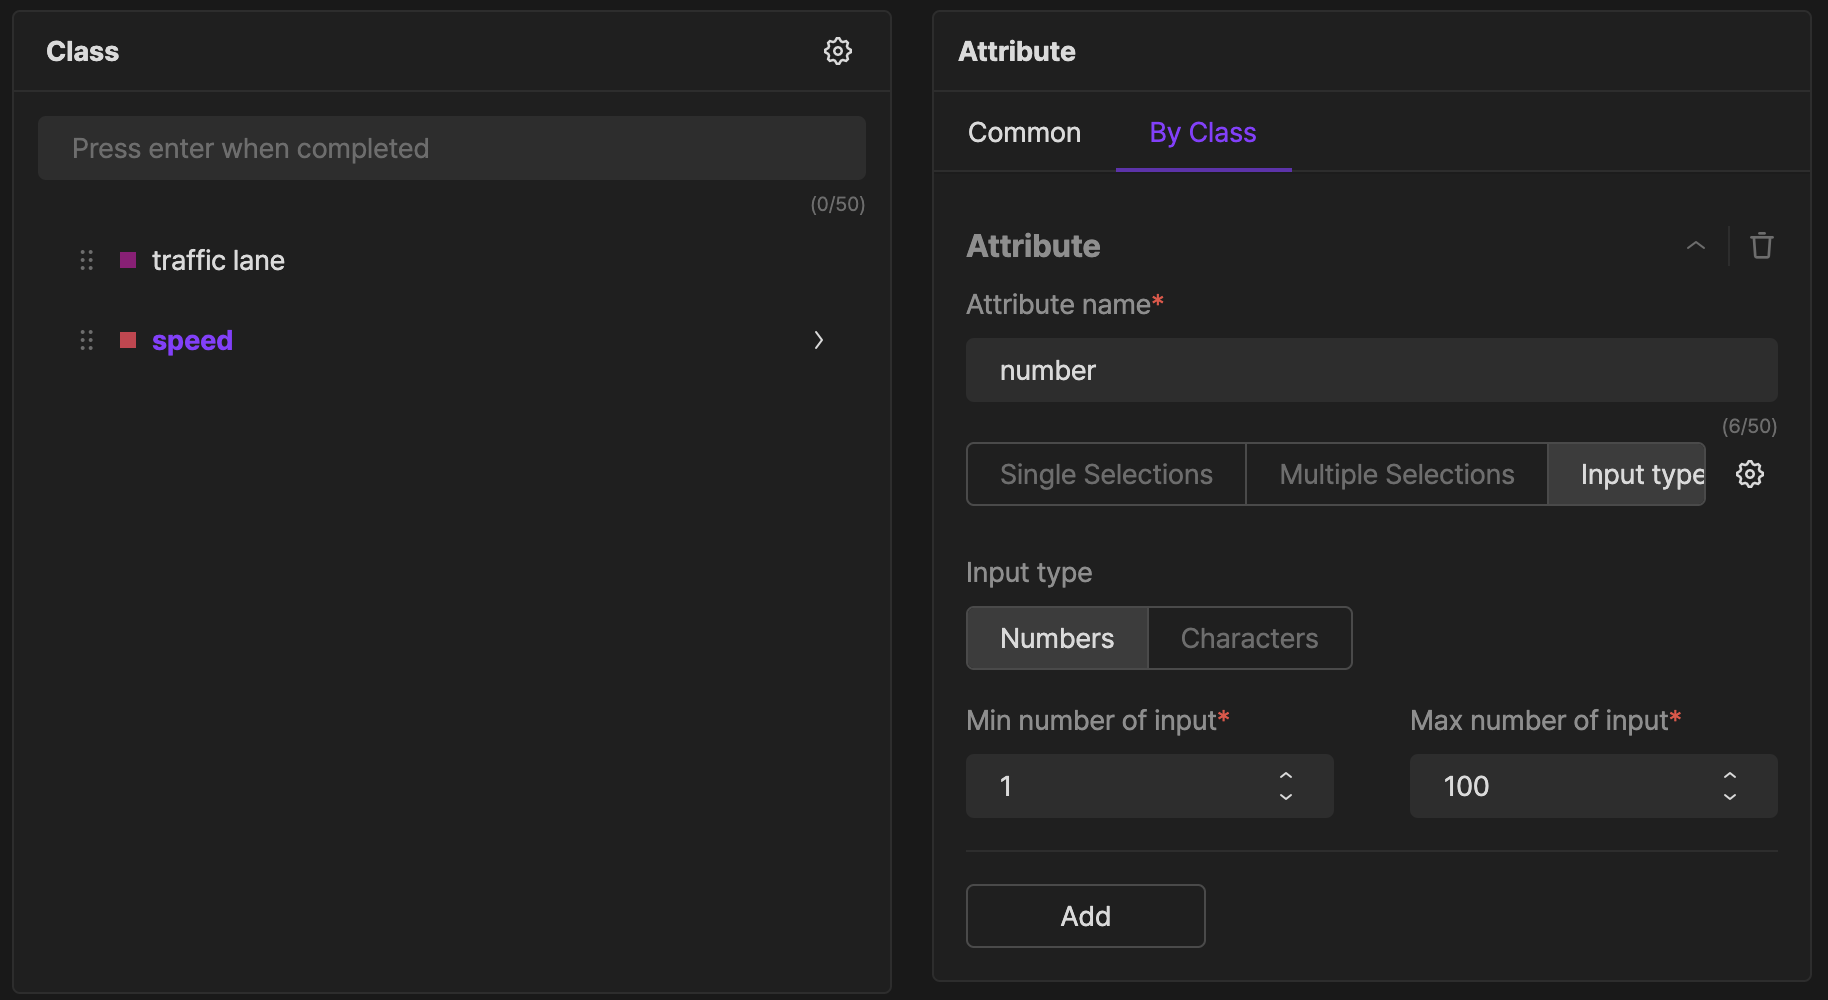
Entering type
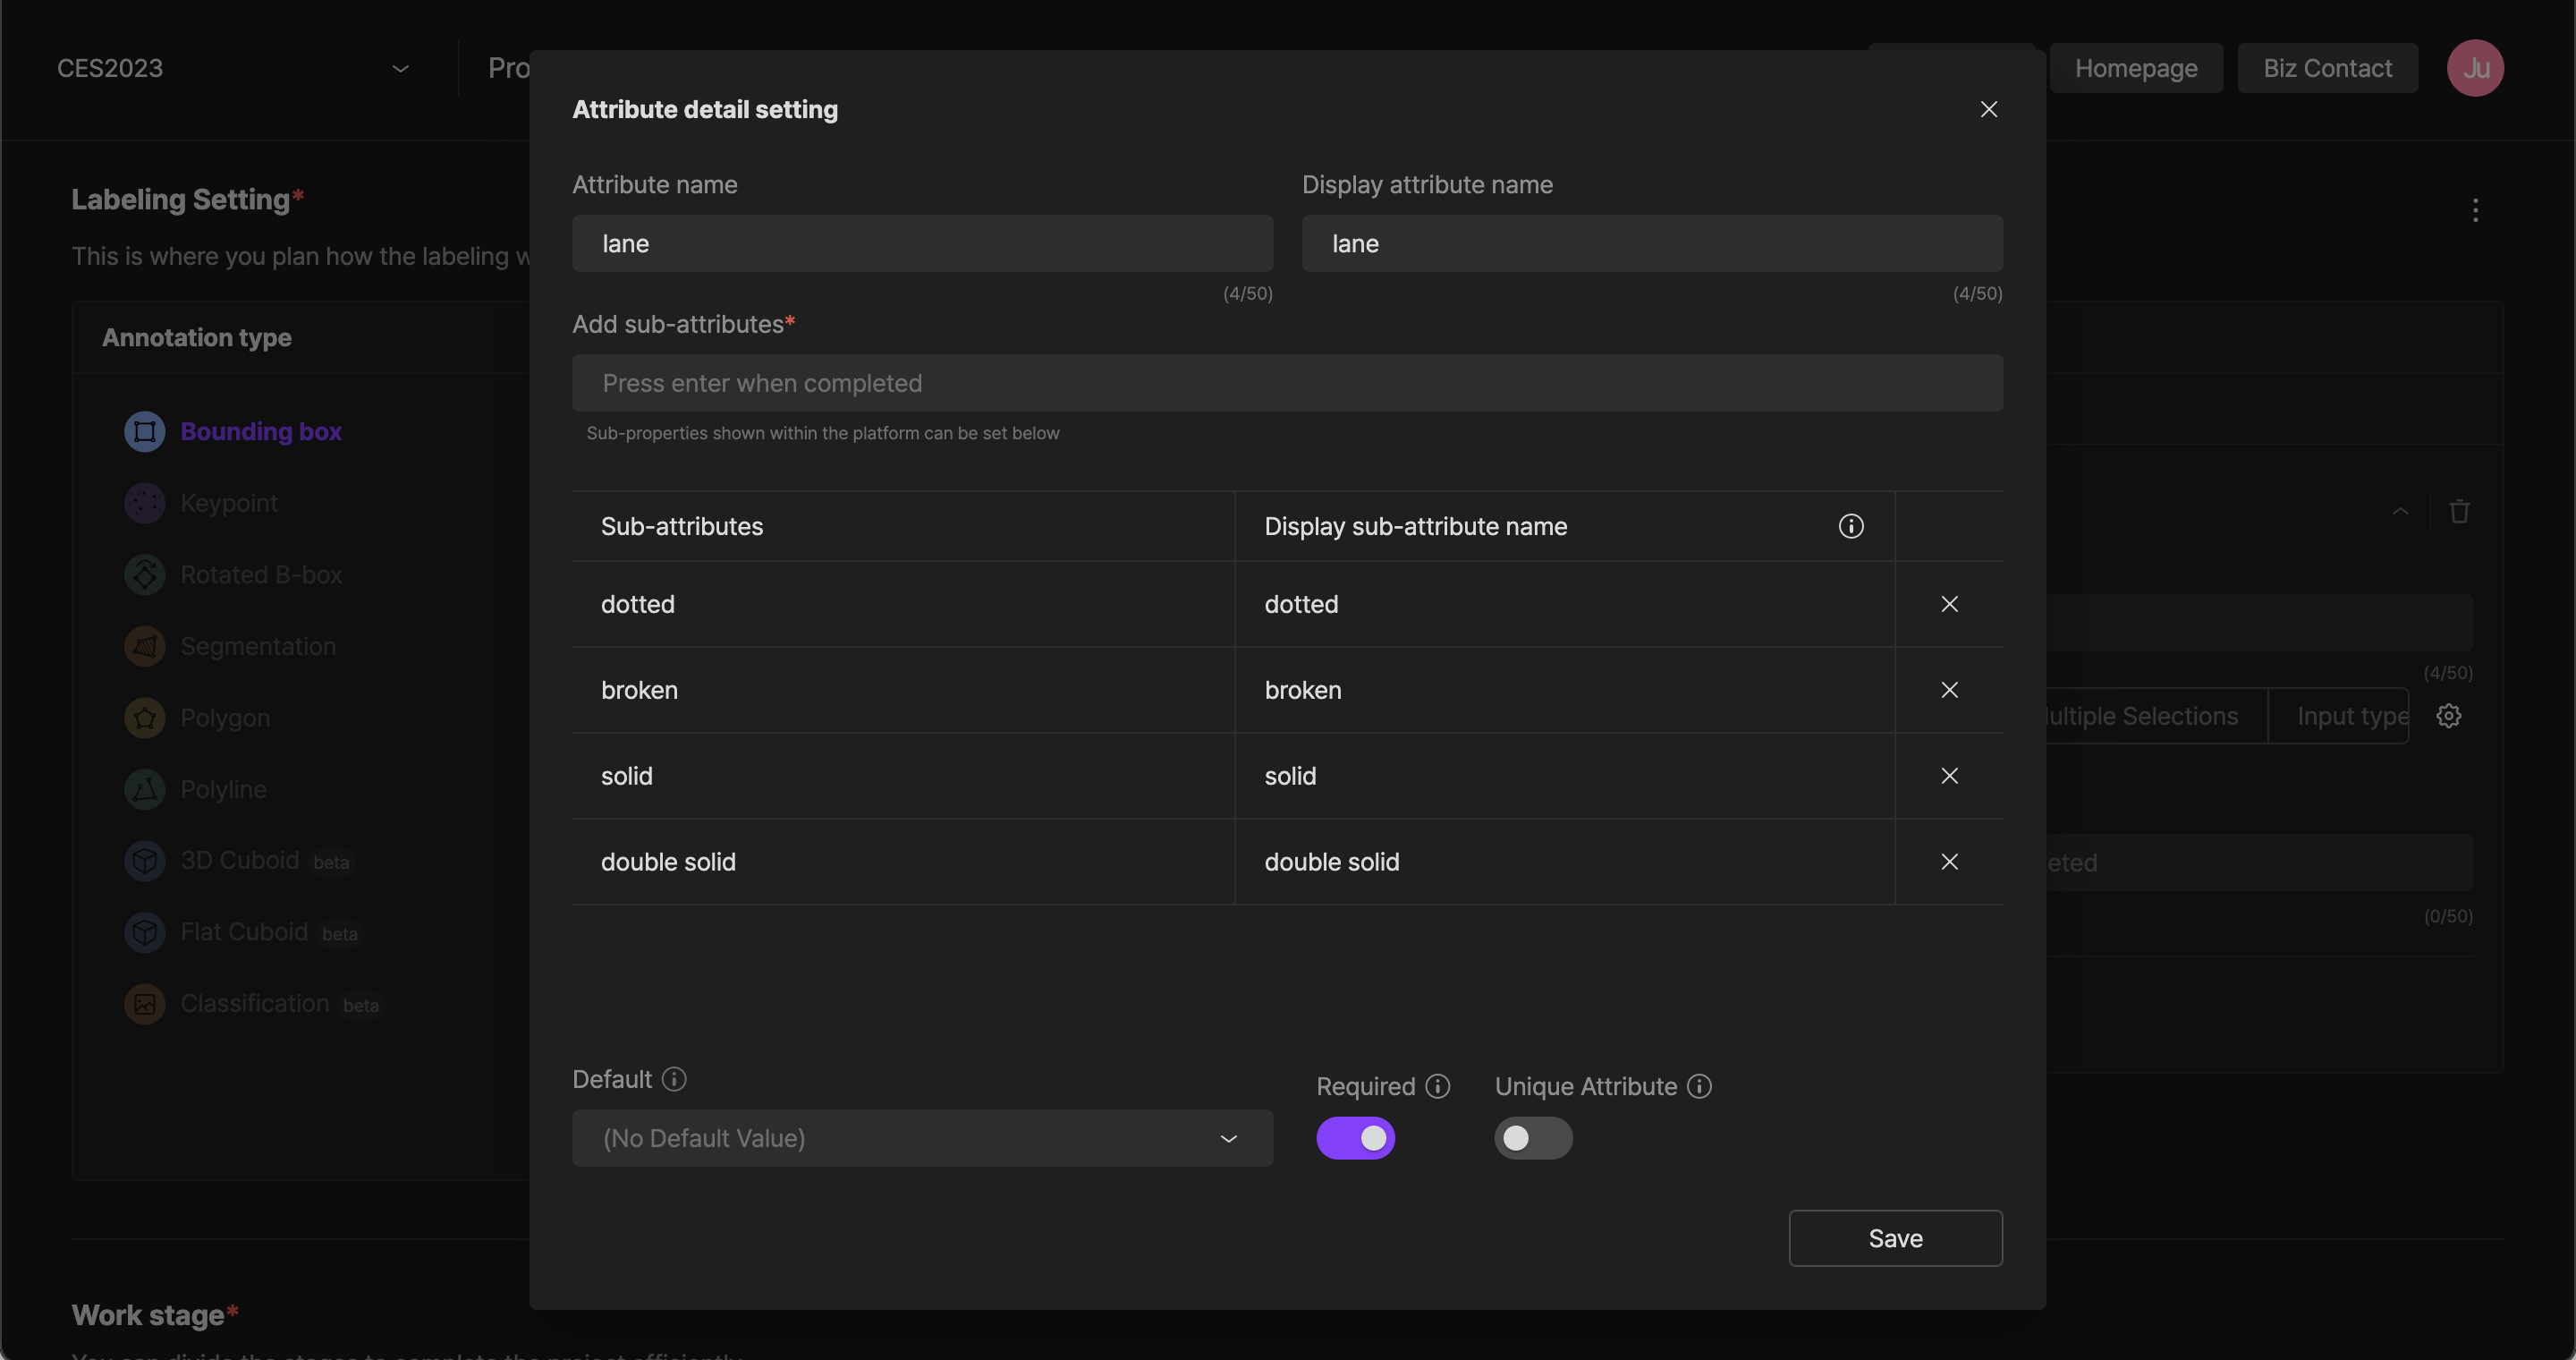
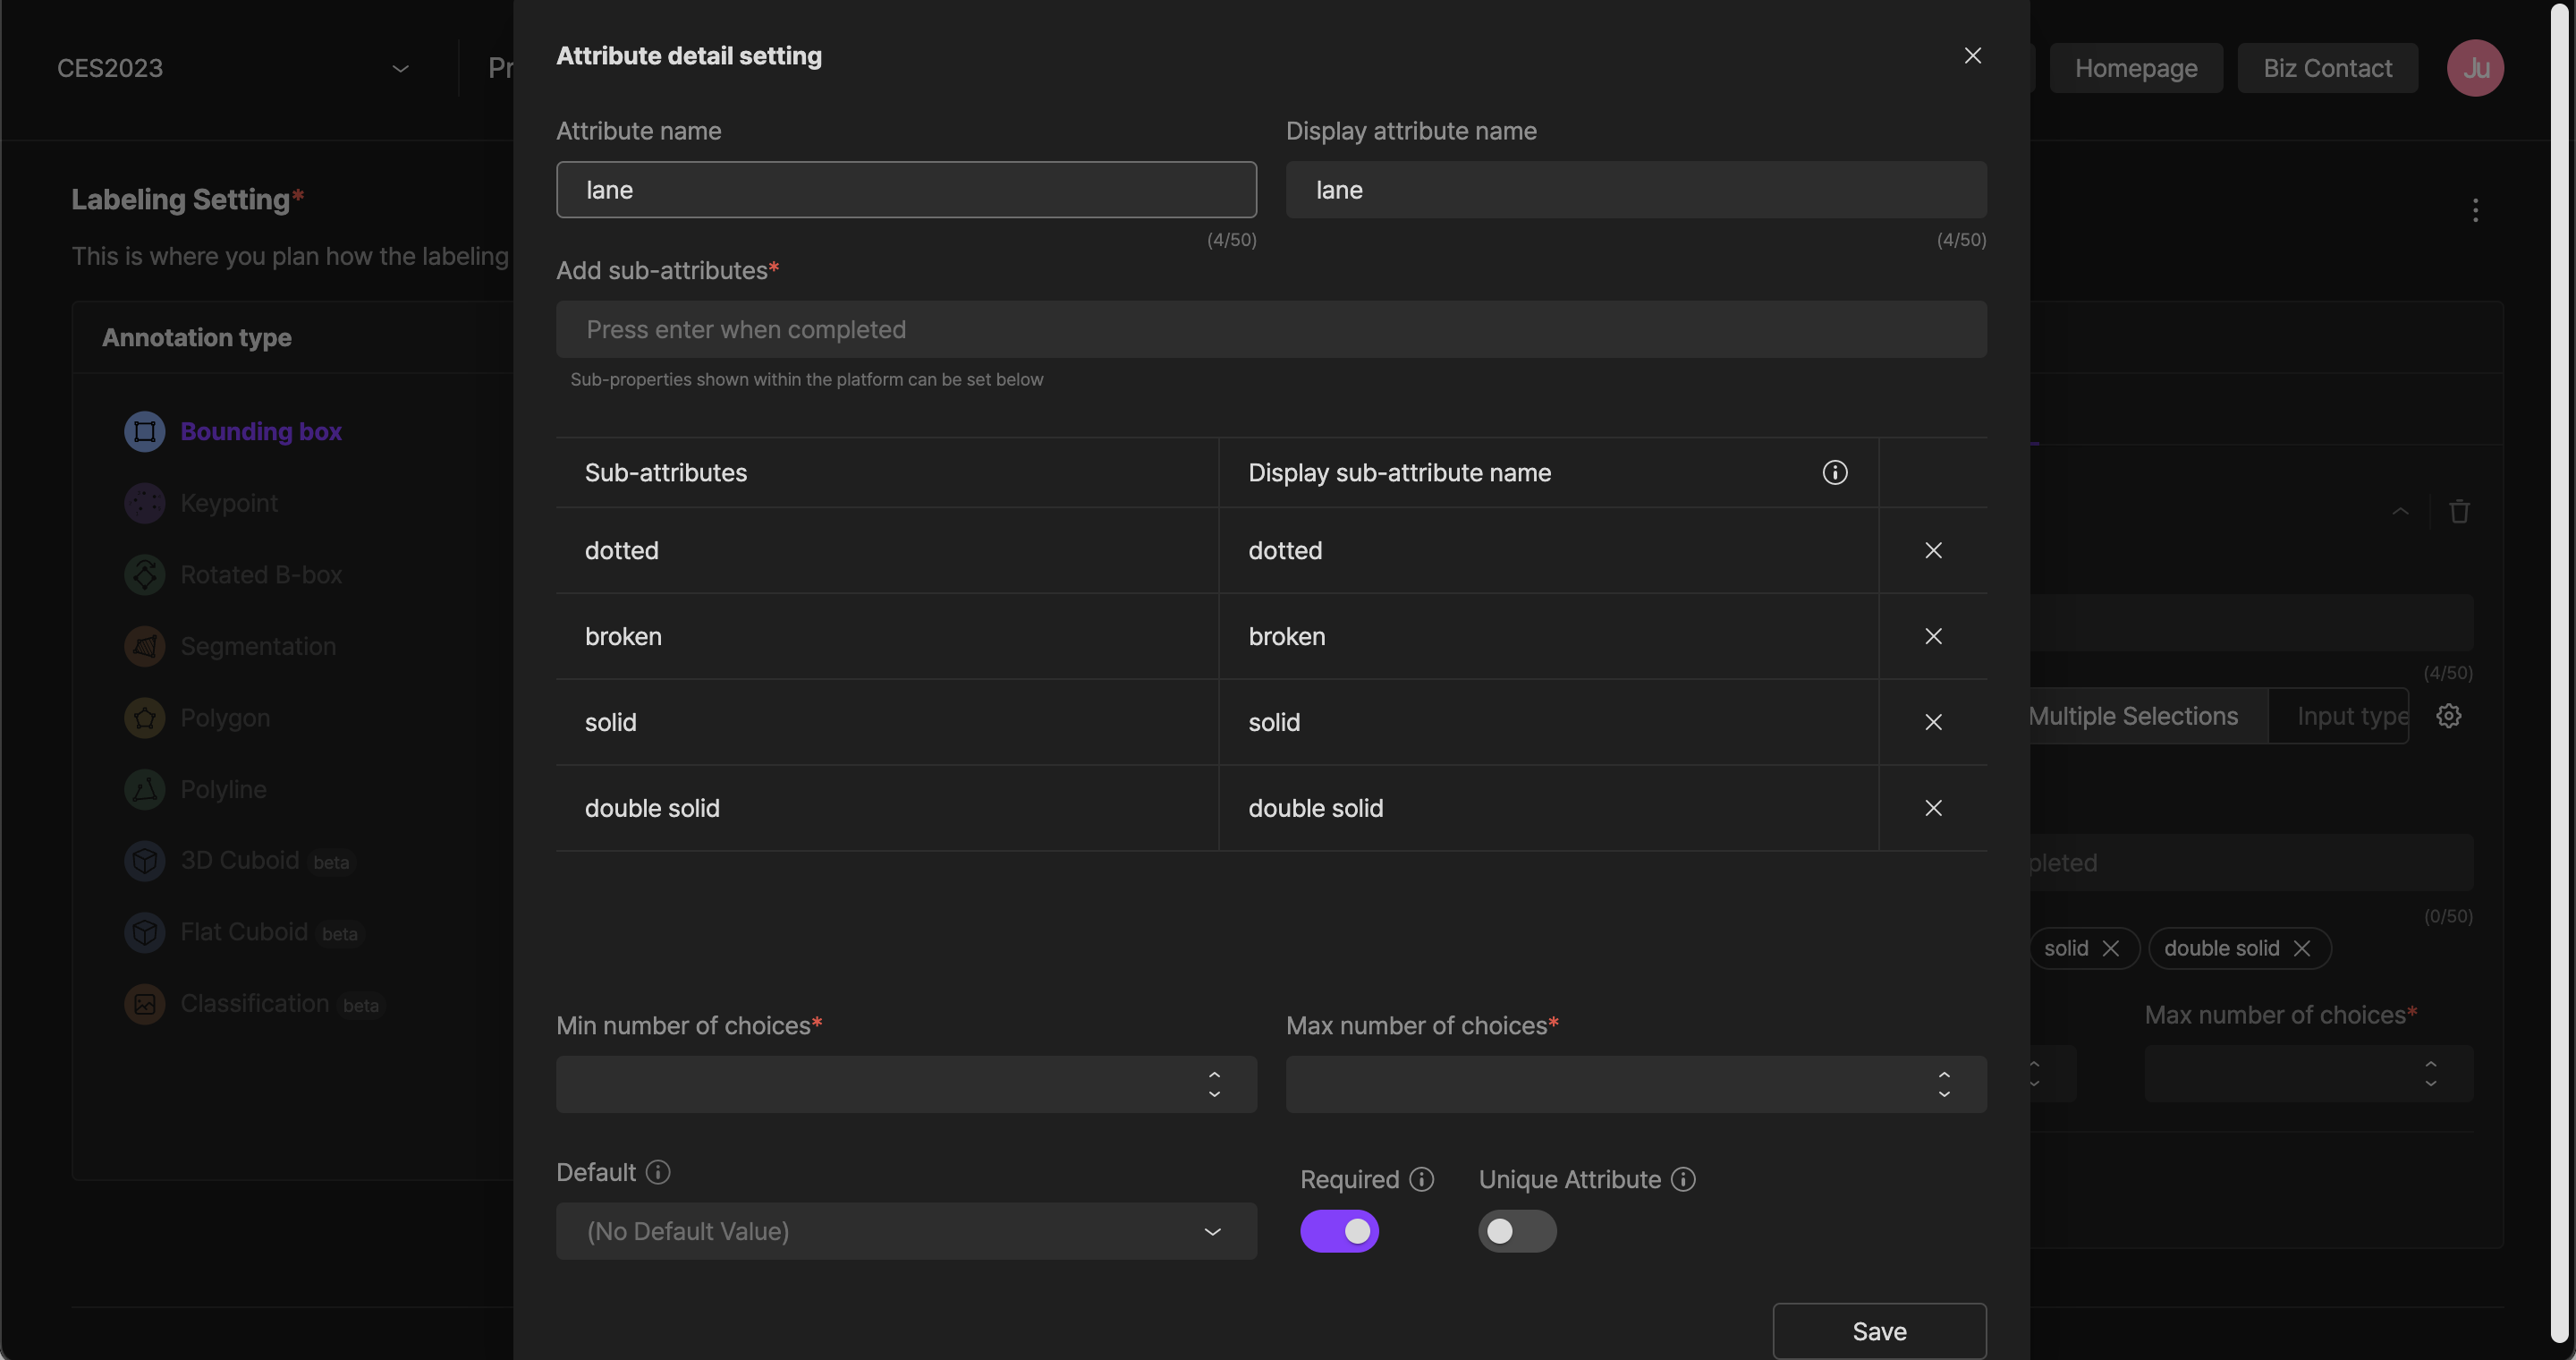
Detailed setting of attributes
Click the set attributes button to check the detailed attribute settings window. The items that can be set change depending on the entering method.
-
Single-selective: Attribute name, attribute name to be displayed, add sub-attribute value (sub-attribute name, sub-attribute name to be displayed), default optional attribute, mandatory setting, original attribute setting
- Load sub-attribute value metadata: the key is a setting that indicates the location of the data on the metadata. This function is used when sub-property values vary from each file. Meta information is registered in the file as a specific key, at this time you can enter a portion for that key.
-
Multi-selective: Attribute name, attribute name to be displayed, add sub-attribute value (sub-attribute name, sub-attribute name to be displayed), the minimum number of selections, the maximum number of selections, default selection attributes, mandatory settings, original attribute settings
-
Entering type: Attribute name, attribute name to be displayed, entering type, minimum input number (number of characters), maximum input number (number of characters) Default selection properties, mandatory settings, original property settings
Delete an attribute
Click Set Attribute and then click the trash bin button for the attribute you want to delete. Alternatively, click the X button for the attribute you want to delete from the attribute value list.
Set attribute default values and set whether they are mandatory or not
Click Set Attributeselect the property that you want to set as the default value from the Default list. If there is no default value, no attribute value will be selected as the default value after selecting a class.
If the mandatory toggle button is set to on, the attribute can be entered as mandatory.
Set whether to keep original attributes
This function applies only to Object Tracking among project types. If you set the toggle button of original attributes to on, make the selected attribute values retained when moving to the next file at the studio.
Load setting values
It is available to load settings values (task type, class, attribute) of the same project type in the workspace. Click Load Settings and then select the project that you want to load the setting values and then click 'Load'.
Single-selective
Multi-selective
Entering type
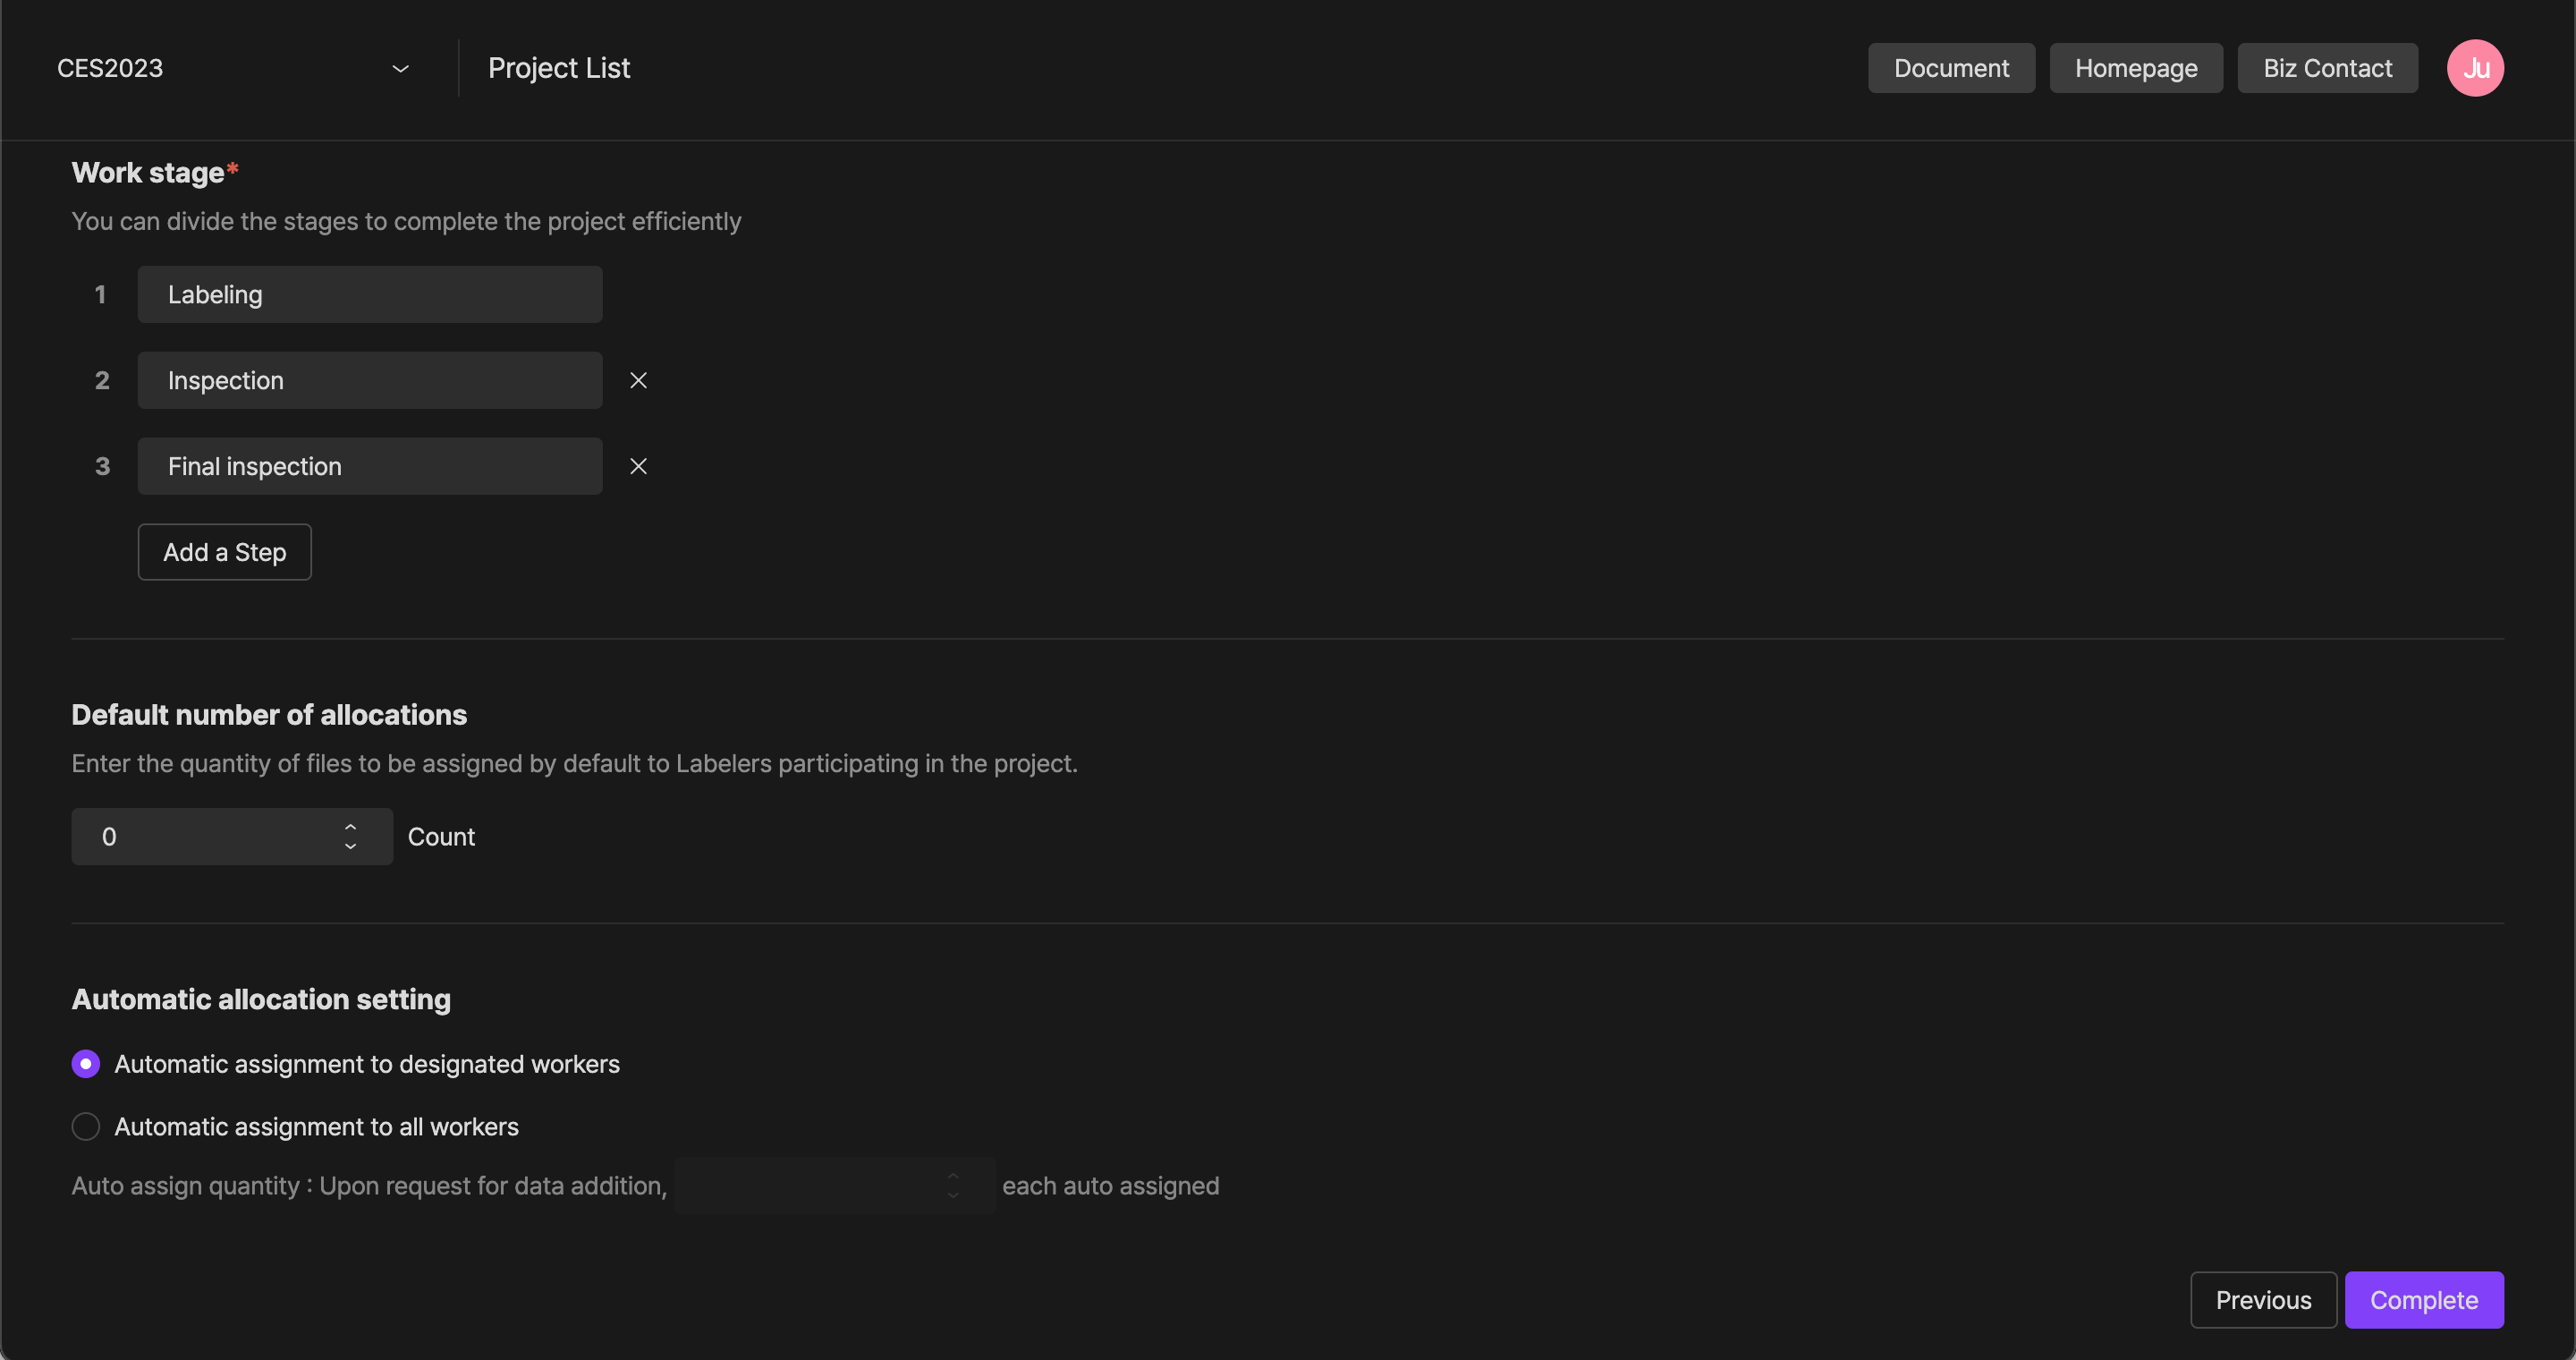
[Task stages]
Set the task stages of the project.
There are basically a total of three stages provided: [Labeling, Inspection, and Final inspection], and you can shorten or increase the stages depending on the user.
After completion of all the stages, it will be displayed as [completed] status.
[Default Number of Allocations]
Sets the default number of assigned files for members who have participated.
If set to 10, participating members will receive an allocation of 10 as soon as they participate and can start labeling data.
[Automatic allocation Settings]
If members of the project have completed data labeling of the assigned file, they can automatically be allocated to additional files through the data addition request function.
At this time, set to allow members from a designated area to receive automatic allocations.
Automatic allocations to designated workers
Only members designated by the PL (project manager) can receive an automatic allocation. The members who receive automatic allocations can be set in the dataset.
Automatic assignment to all workers
All members who participate in the project can receive automatic assignments. Members can request to add data immediately after completing the labeling task of the allocated file and can receive automatic allocations of as many as the amount that PL allocated.
If you have any other inquiries, please get in touch with us at [email protected]
Updated about 1 year ago