
Annotation type
When you select the labeling setting menu, it moves to the task Information tab.
It is available to check the labeling information set when creating a project.
Project type
It is available to check the items of the project type set when creating a project. It cannot be modified.
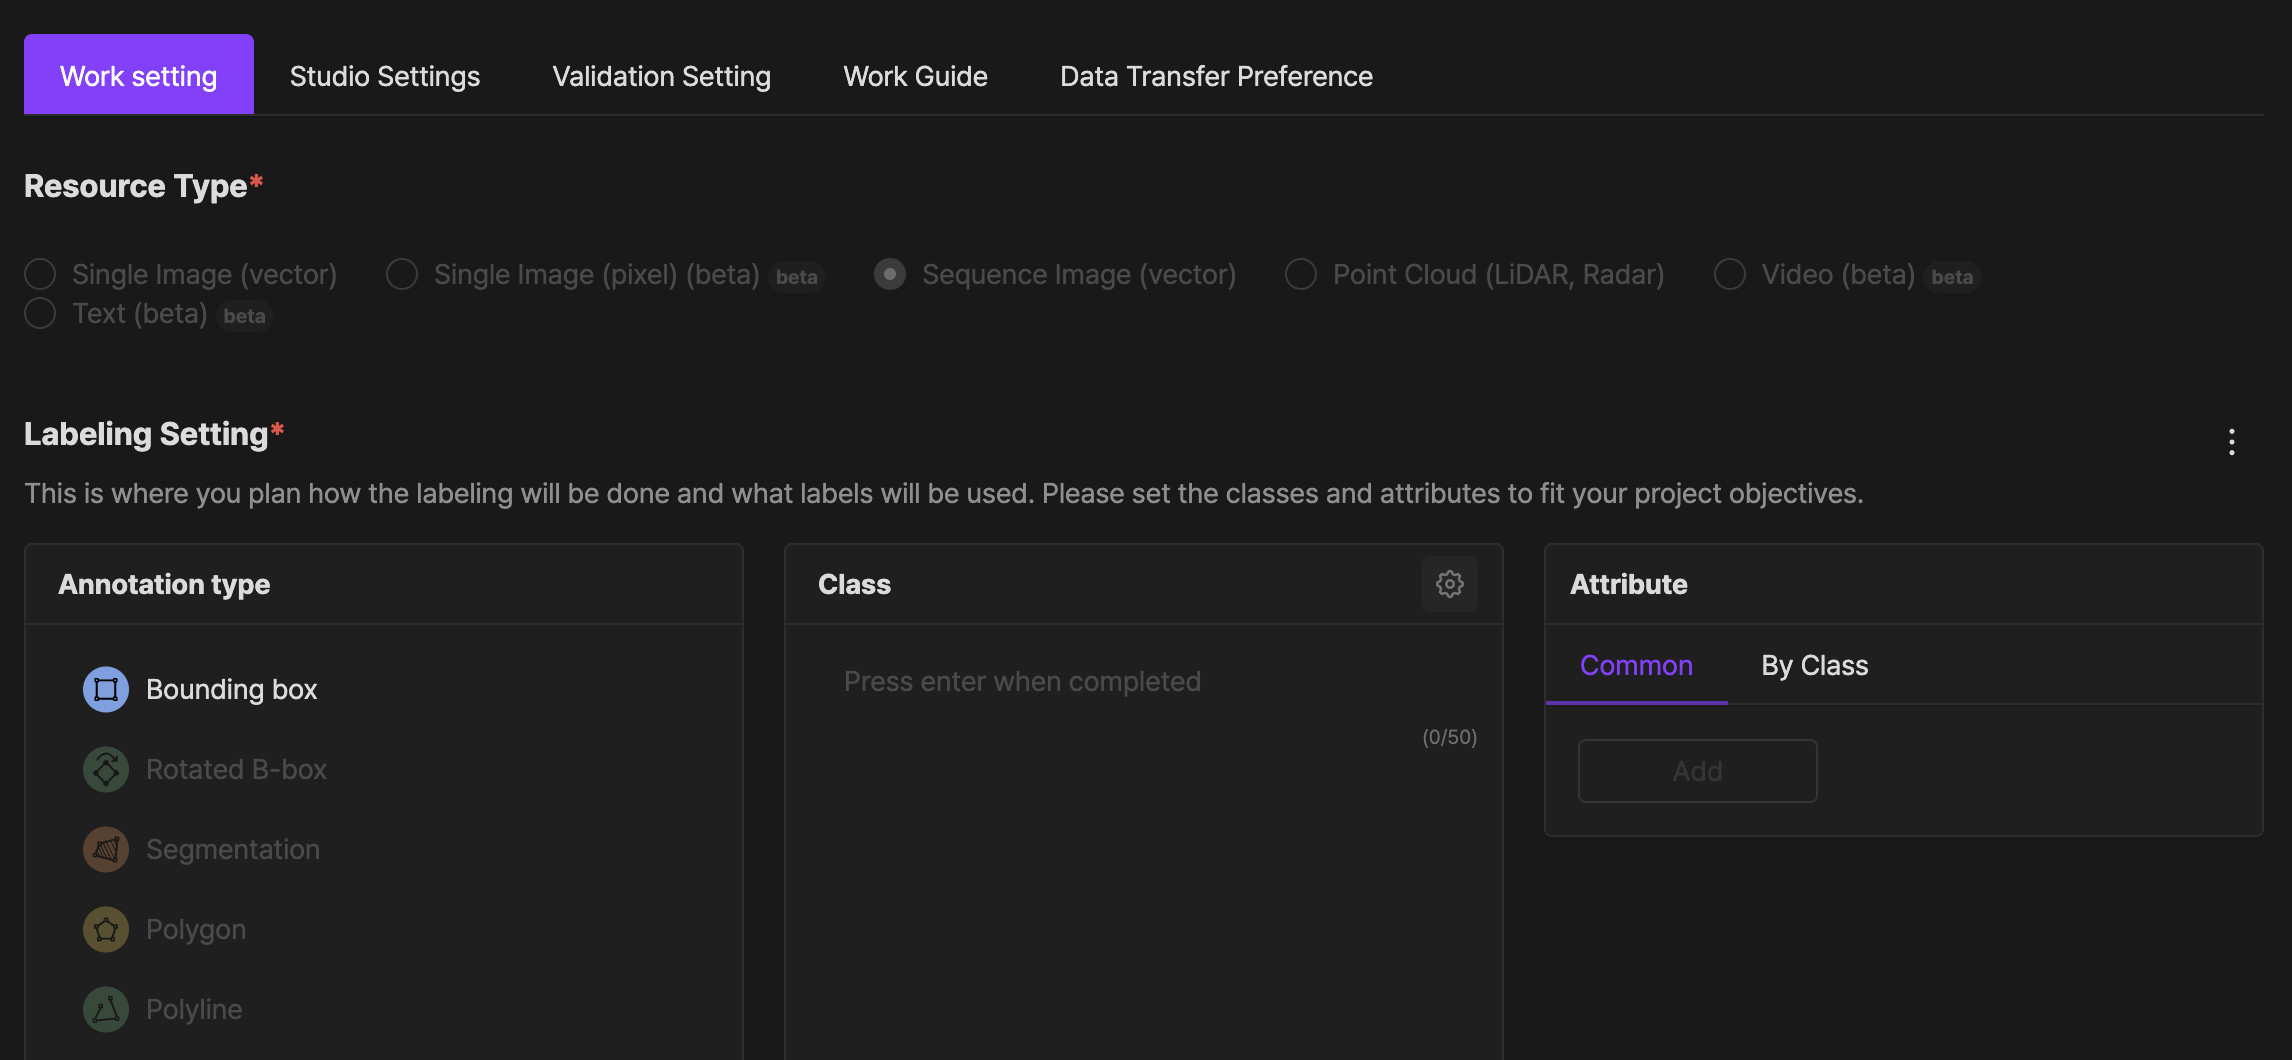
Annotation type, classes, and attributes
It is a setting stage for task data methods and labels.
It is available to check the items set when creating a project, and add/delete task types, classes, and attribute information.
When you delete a class or attribute that is already labeled, the instance remains and changes to an unentered status.
Annotation type
The items of task types that can be selected vary depending on the project type selected by the user.
The characteristics of each of these task types can be checked in [Project task types].
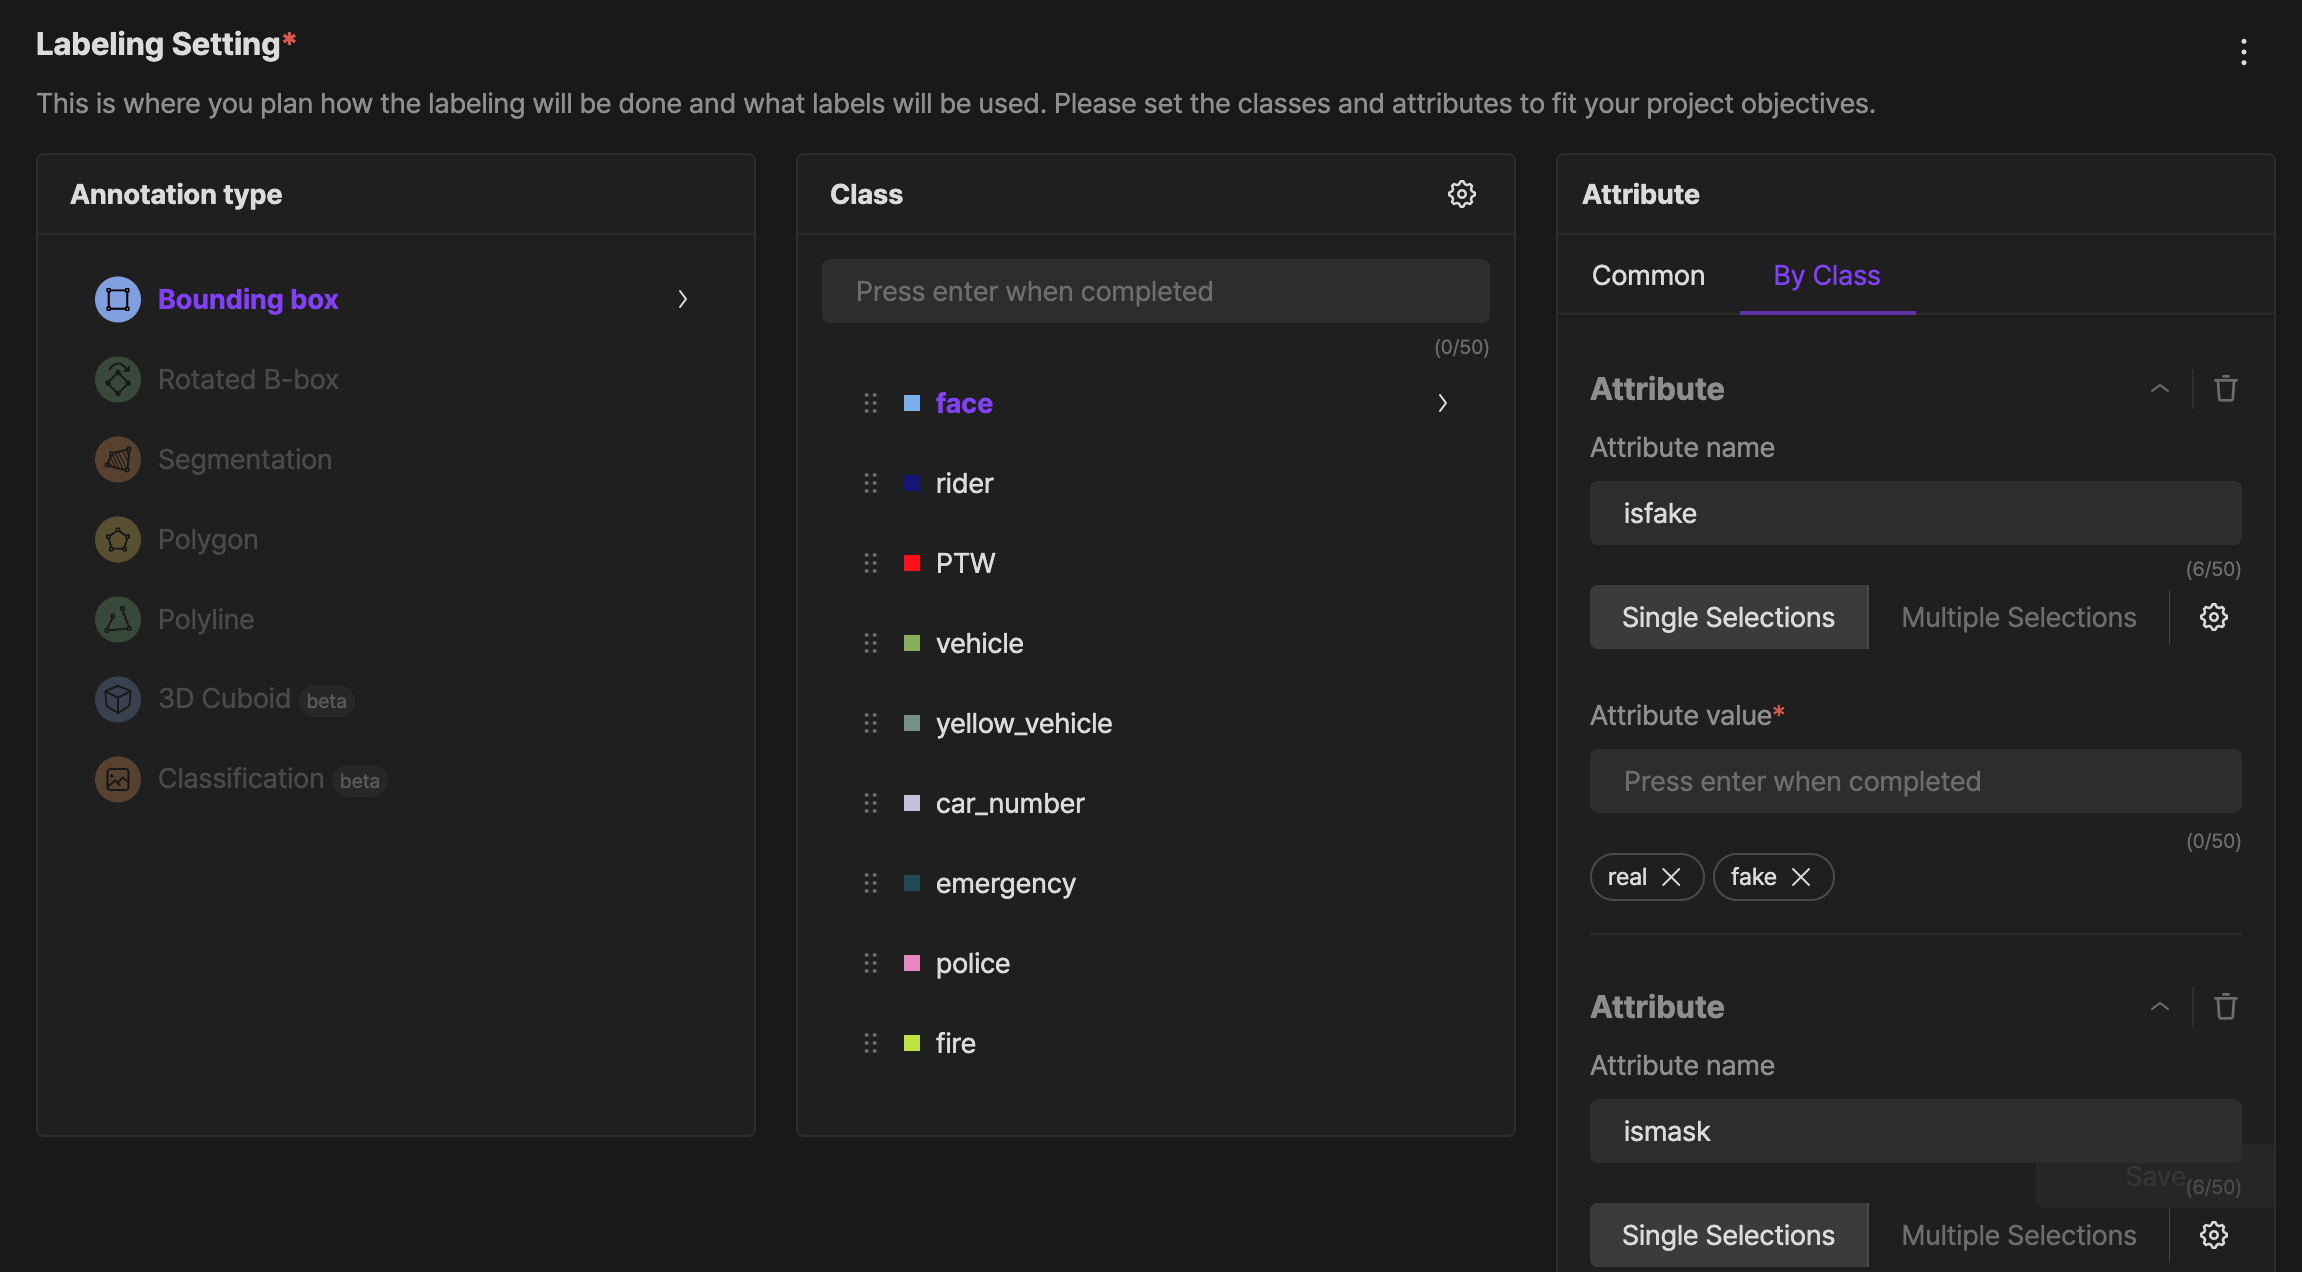
Class
It is available to set up classes by each task type.
After selecting the task type, enter the class name in the activated class input box and press Enter to add it.
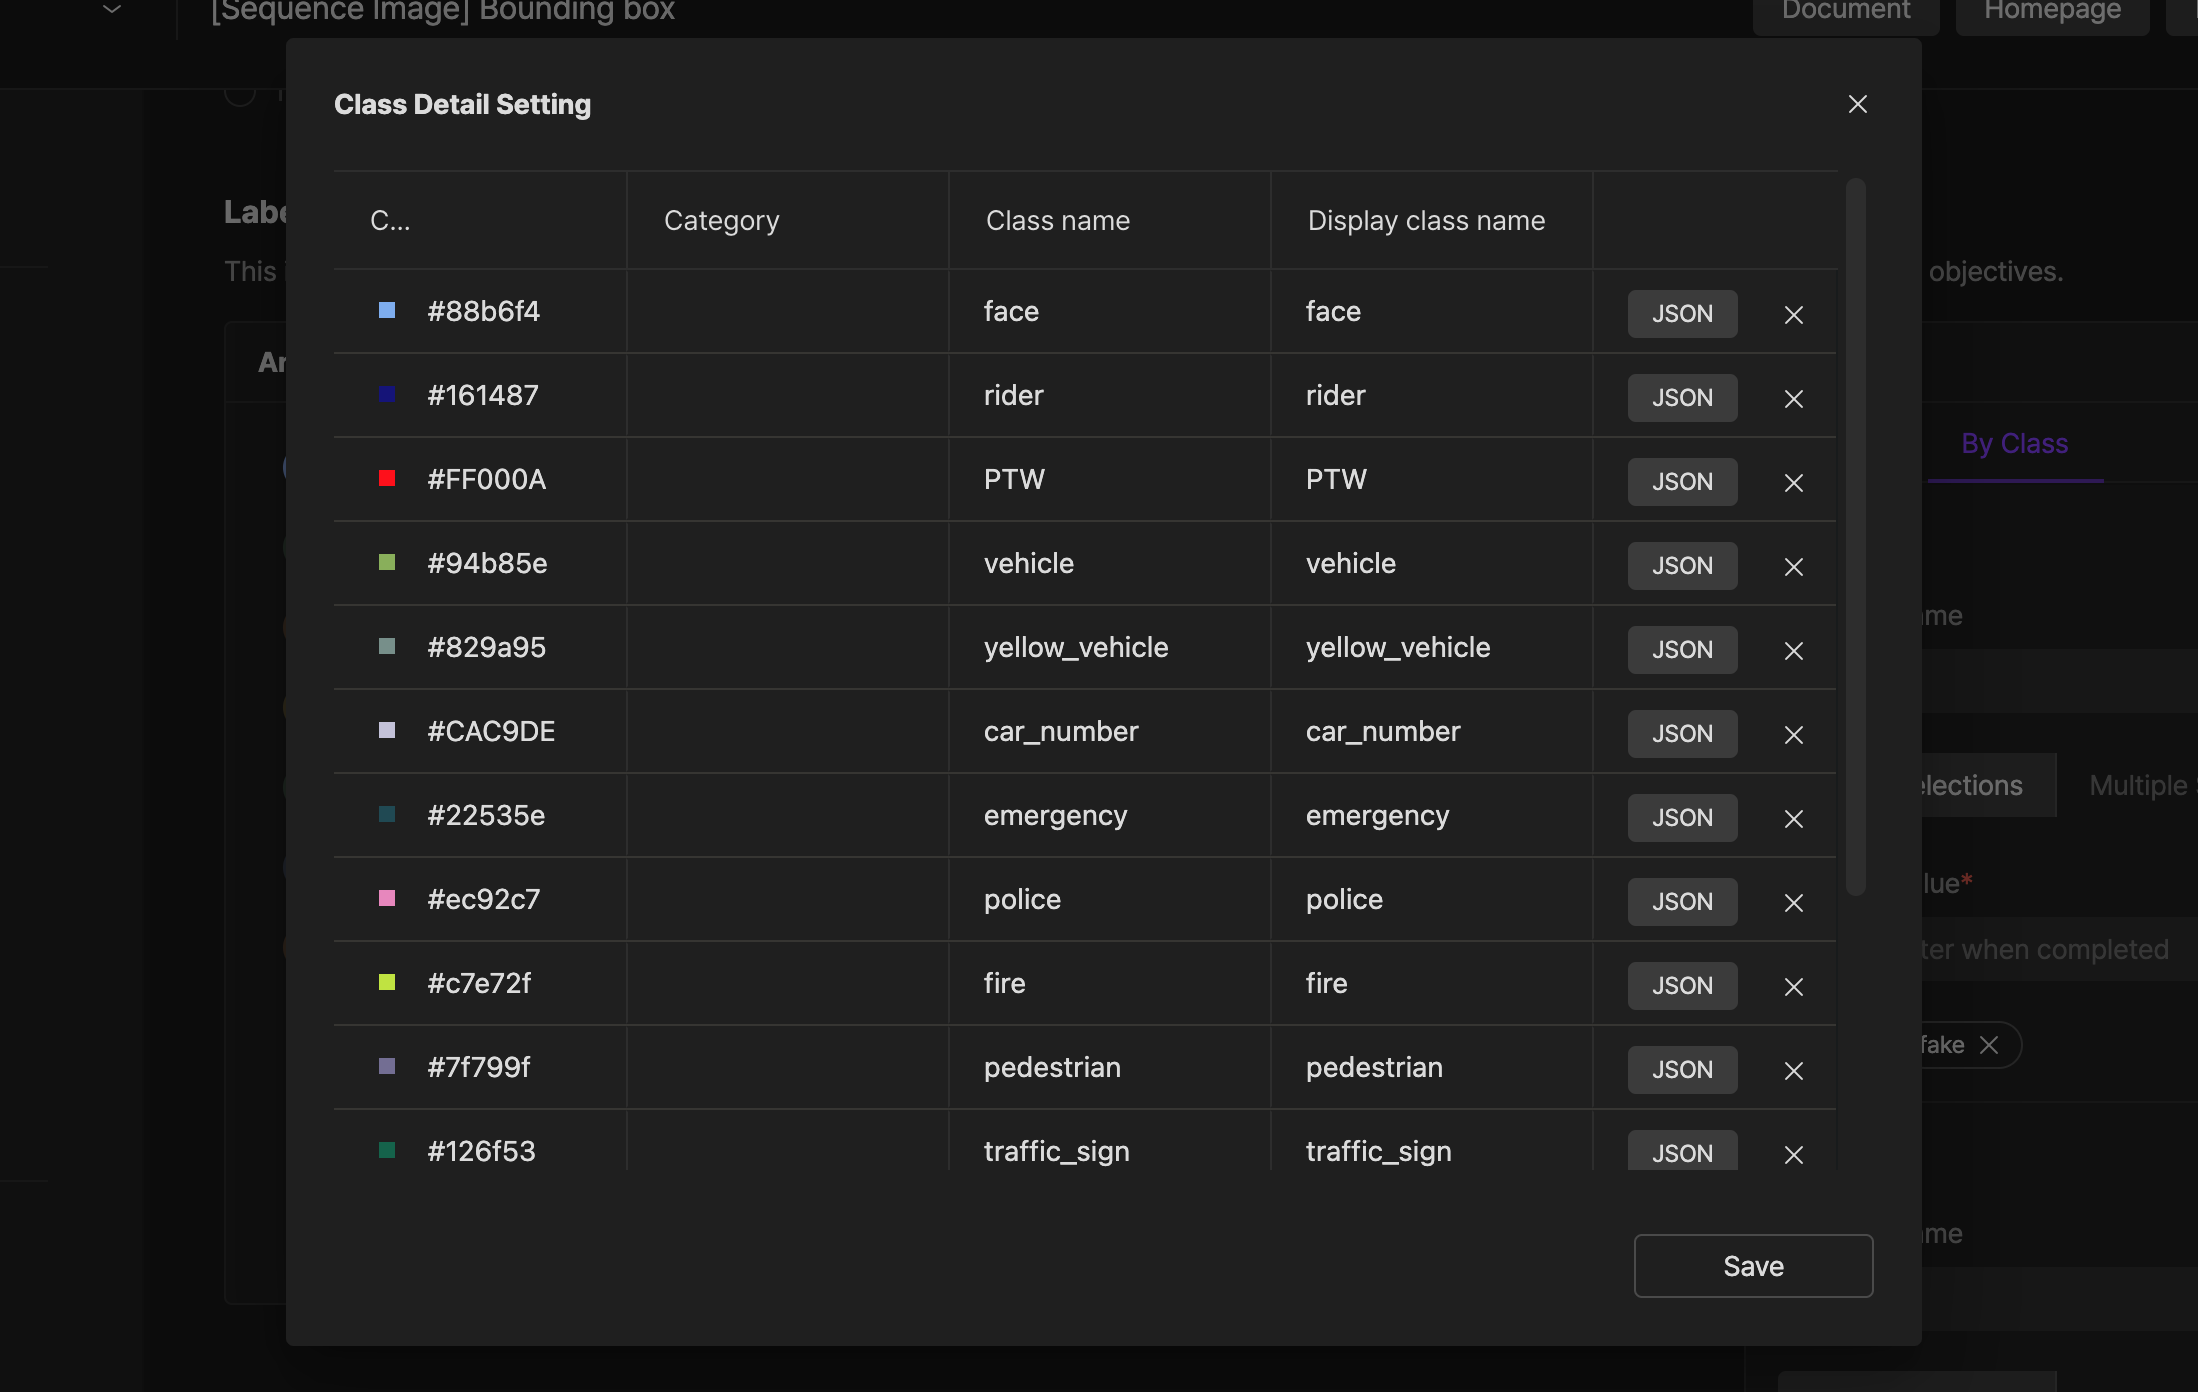
Detailed class settings
- Click the class setting buttons to check the detailed class settings window. It is available to edit the color and category of the class, the name of the class, and the name of the class to be marked.
- By clicking the
JSONbutton, it is available to use the JSON input CLI. - It is available to copy and paste tables from Excel or Google sheets.
- After hovering over the class that you want to delete, it is available to delete the class by clicking the
Xbutton on the right.
Detailed class settings for using Keypoint tasks
Keypoint JSON settings are required to use the Keypoint task type in a project.
It is required to enter the class-specific CLI by clicking the JSON button in the detailed settings window of the Keypoint class you have set.
Guide images for keypoint tasks can be attached.
- Attach an image :
"guideImageUrl": "image link"
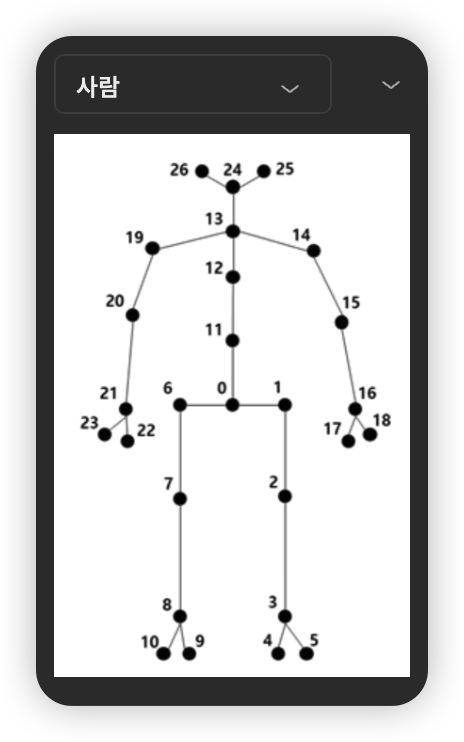
Example of attaching a Keypoint task image
It is available to set the color, ID number, and name by each keypoint.
- color :
"color": #000000 - ID number :
"id": "0" - name :
"name": "0 thumbs"
Example of Keypoint class JSON code
{
  "additionalOptions": {
    "edges": [
      {
        "color": "#000000",
        "keyPointIds": [
          "0",
          "1"
        ],
        "opacity": 0.9,
        "strokeWidth": 1
      },
    ]
  },
  "guideImageUrl": "https://IMAGEURL",
  "minBoxHeight": {
    "type": "pixel",
    "value": 1
  },
  "minBoxWidth": {
    "type": "pixel",
    "value": 1
  },
  "pointLabels": [
    {
      "color": #000000,
      "id": "0",
      "name": "0 thumbs",
      "optional": false
    },

  ],
  "pointValidationEnabled": true,
  "validationRuleType": "all_pass_needed"
}
Attributes
It is available to set sub-properties of a class and freely add and delete.
If there is no set value, labels with class information only.
Target to apply attributes.
- Common attributes : Enter attribute values that will be common to all classes.
- Attributes by each class : Enter attribute values that will be only applied to the selected class.
For example, when you try to distinguish the color, type, and size of cars on the road, enter “color, vehicle type, size” as the attribute name “car” for the class. Then, enter large, medium, and small values corresponding to various values of size as attribute values.
A method to enter attributes
Attributes can be entered in 3 ways, and depending on the input method, it is available to check the detailed attribute settings window.
- Single selective type: When labeling, select only one of the attributes set under the class.
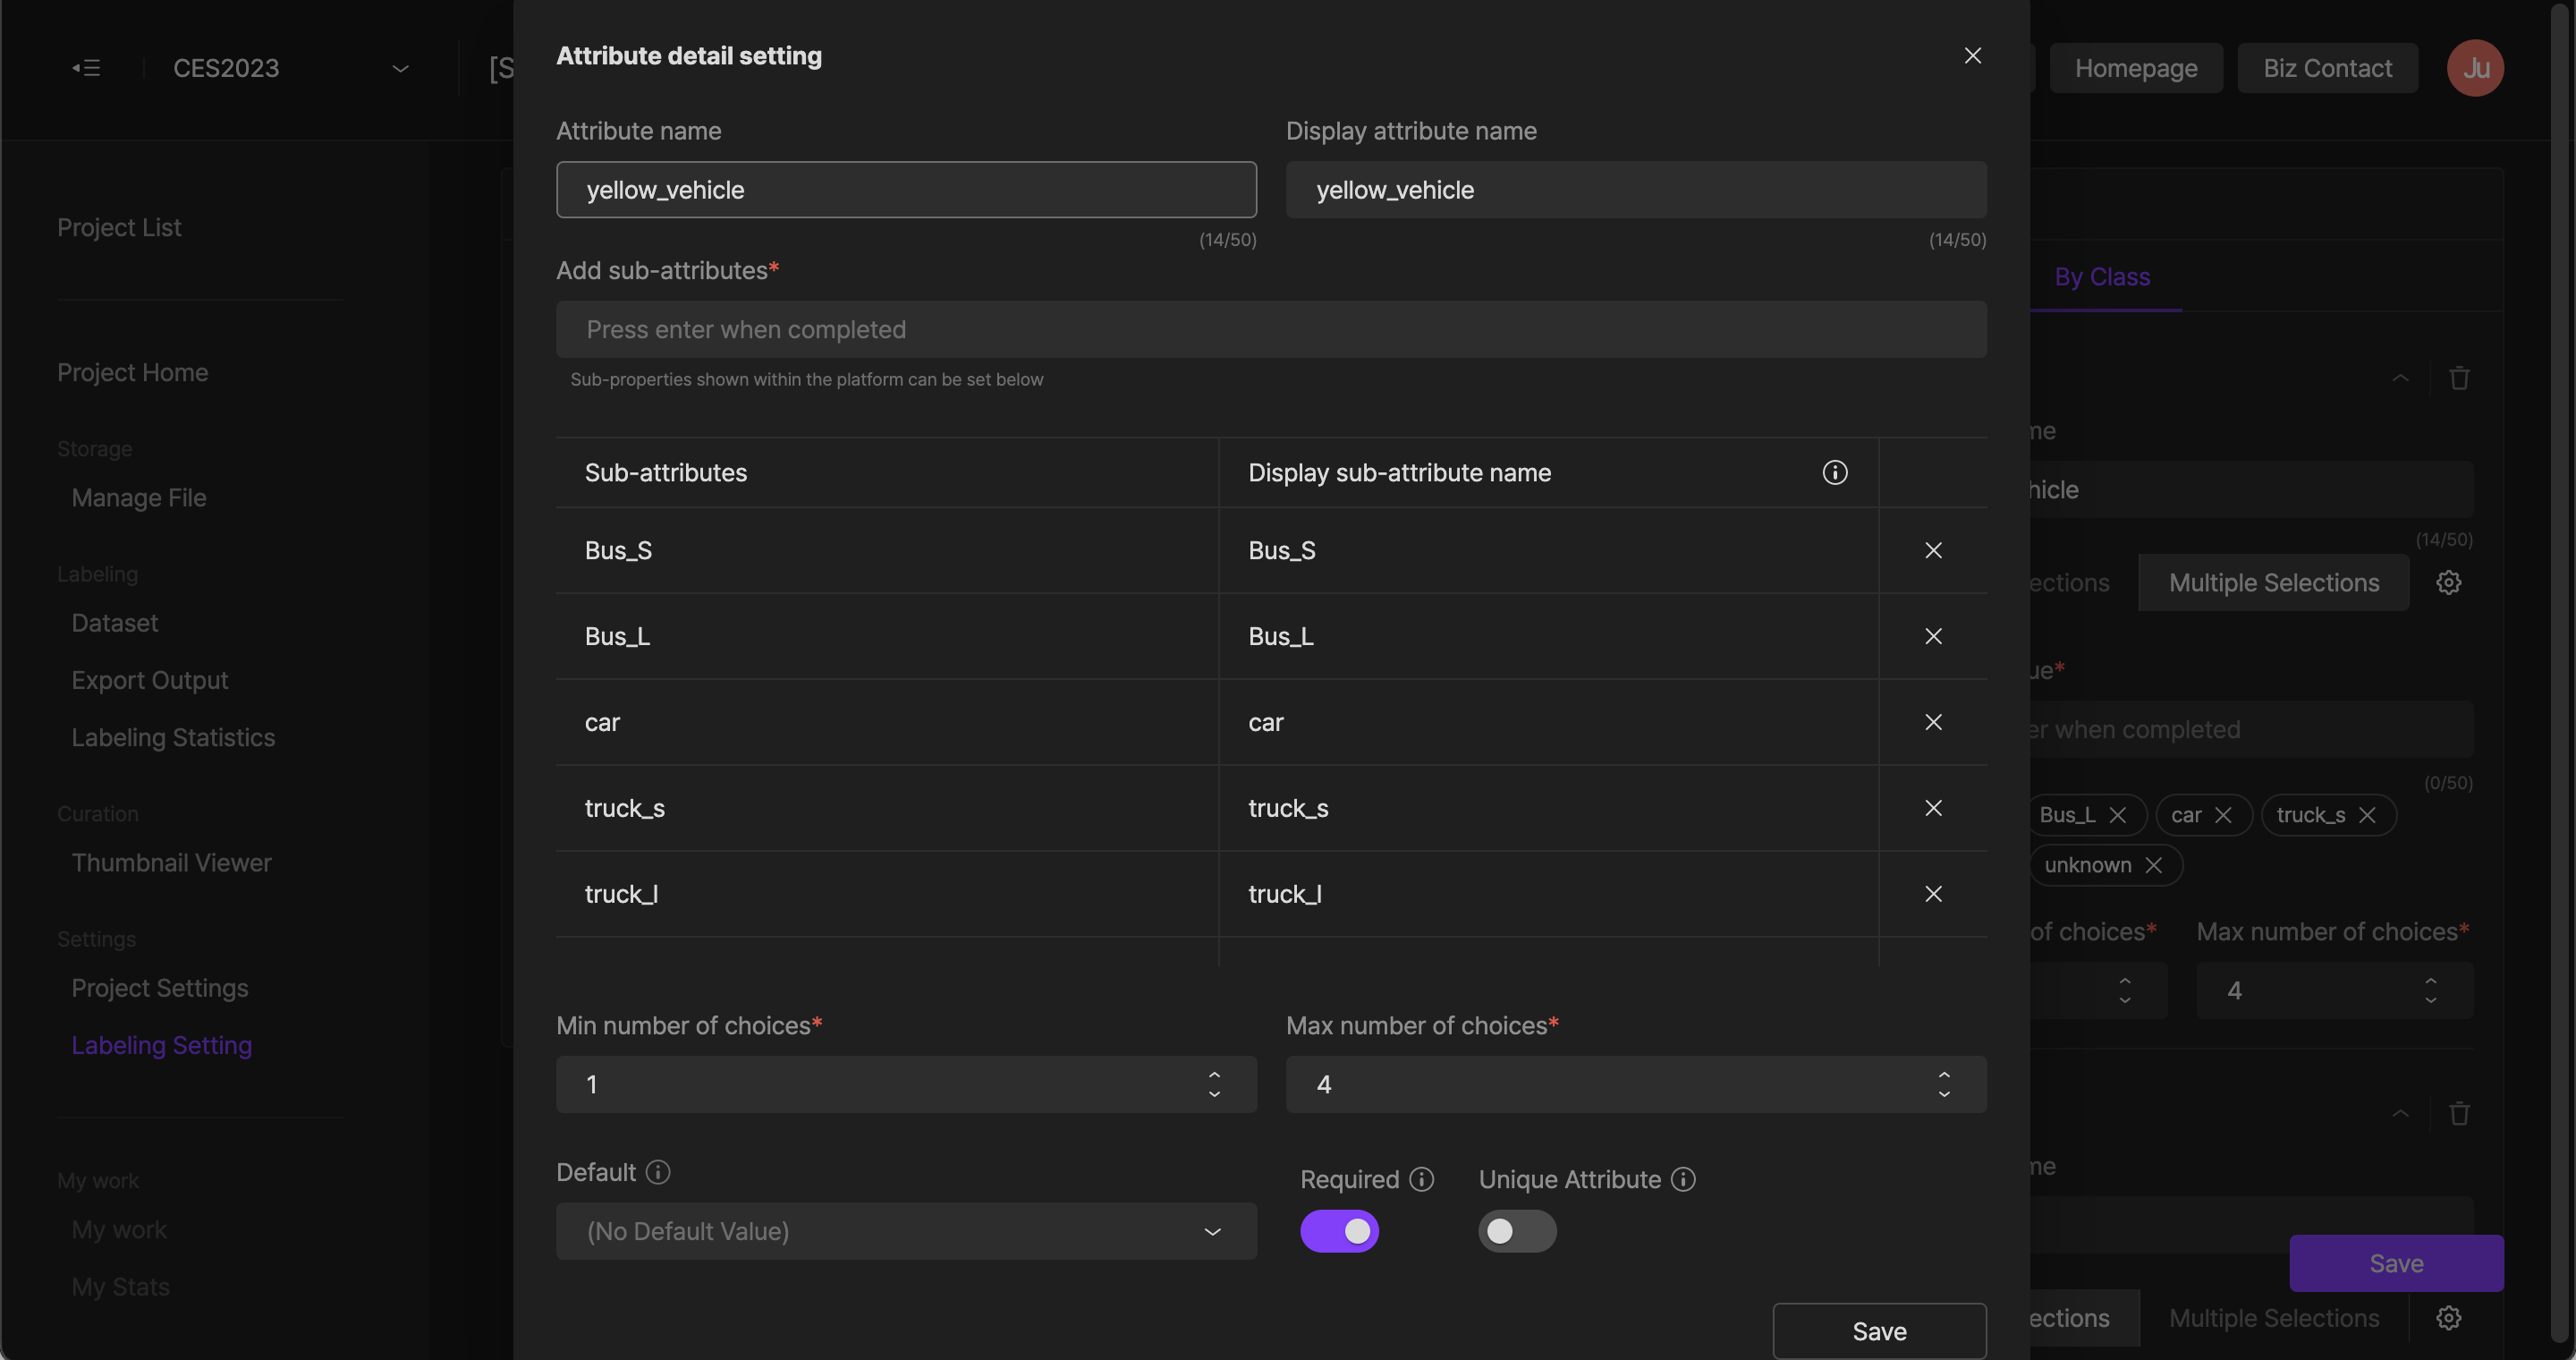
- Multi-selective type: When labeling, it is available to select multiple attributes set under the class. It is available to set a minimum number of choices and a maximum number of choices.
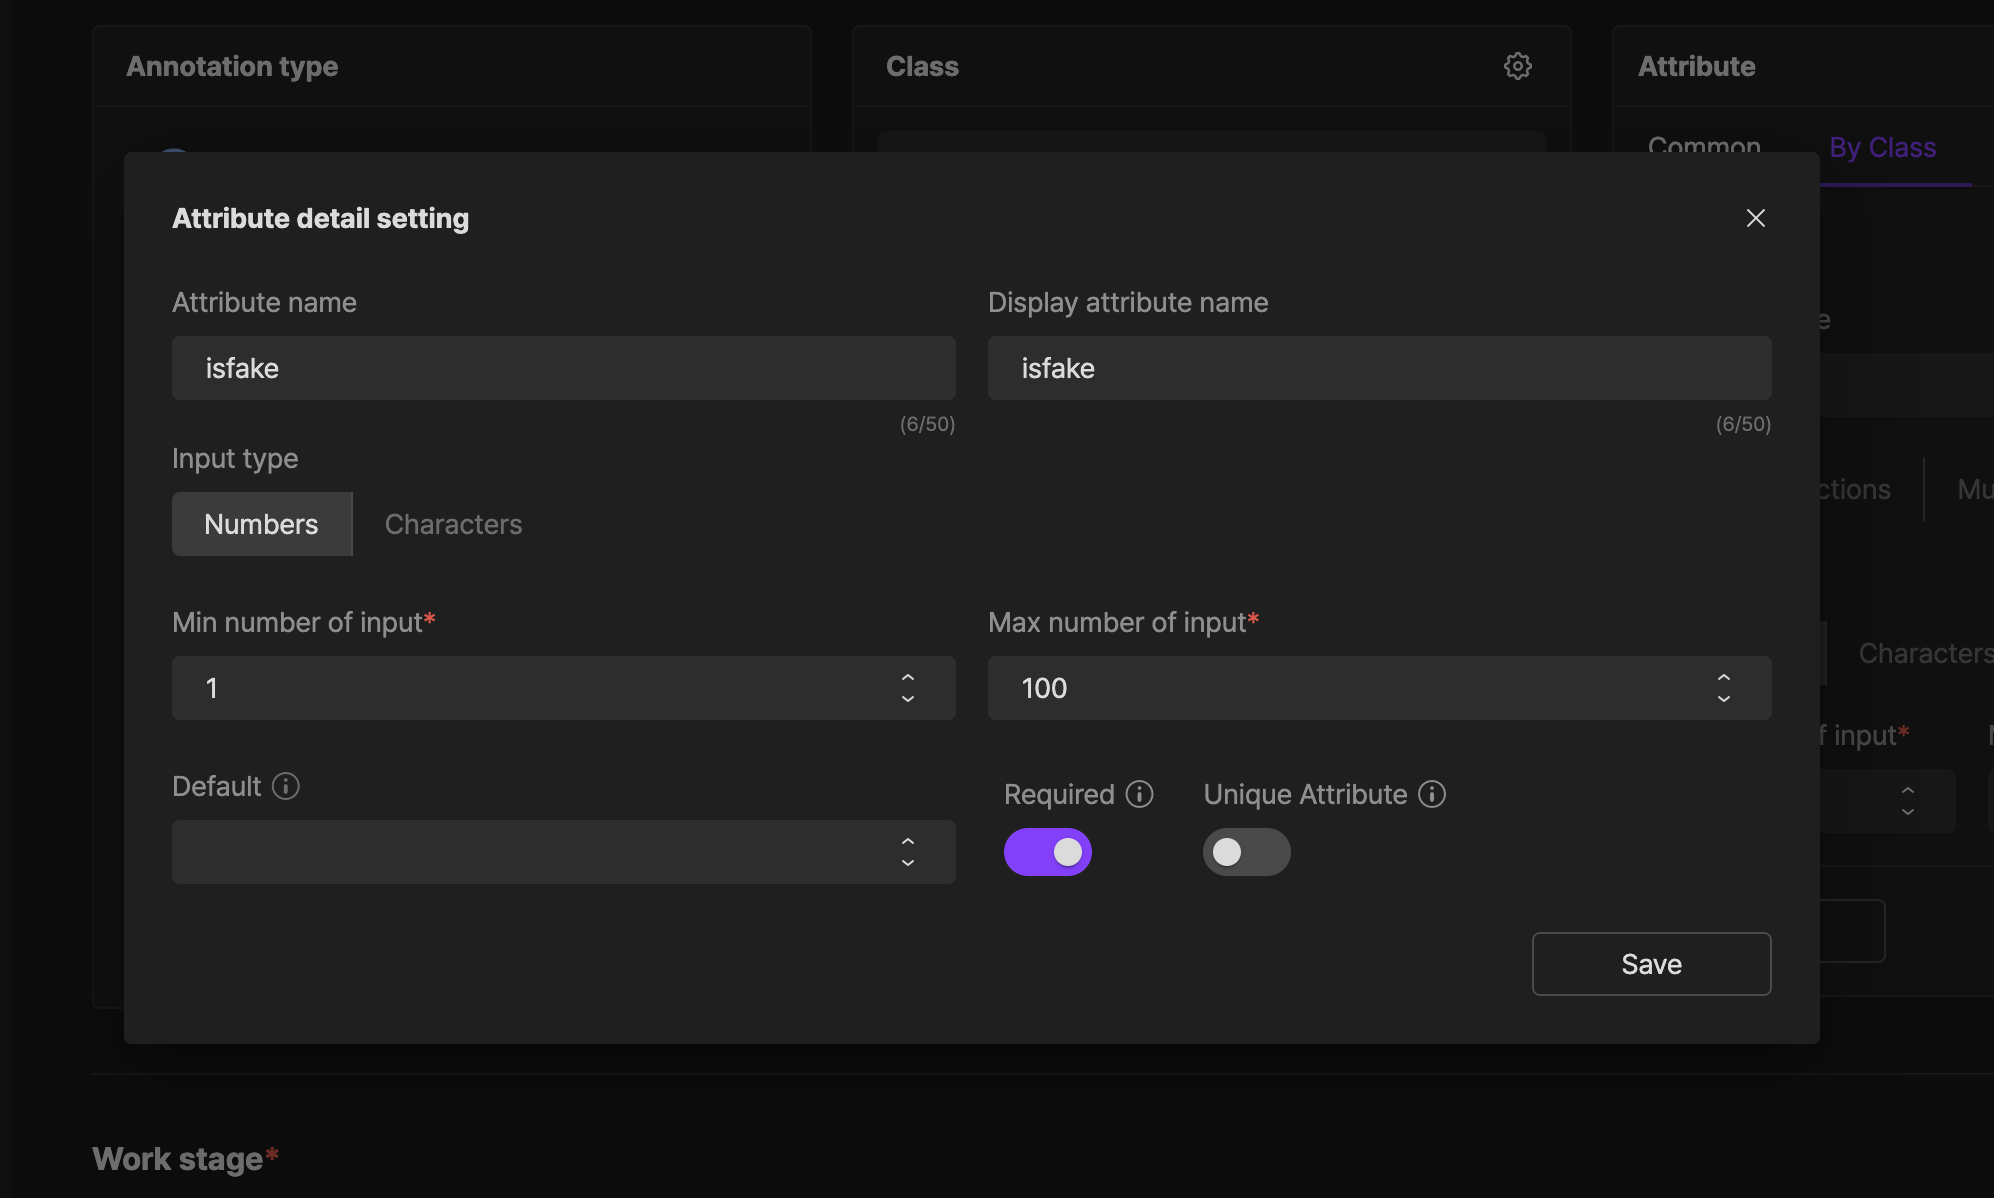
- Entering type: The labeler determines and enters the attributes directly, and the entering type is available to be selected between numbers and letters. When selecting numeric input, it is available to set minimum and maximum input values. When you select ‘enter the text’, it is available to set the minimum number of characters to enter and the maximum number of characters to enter.
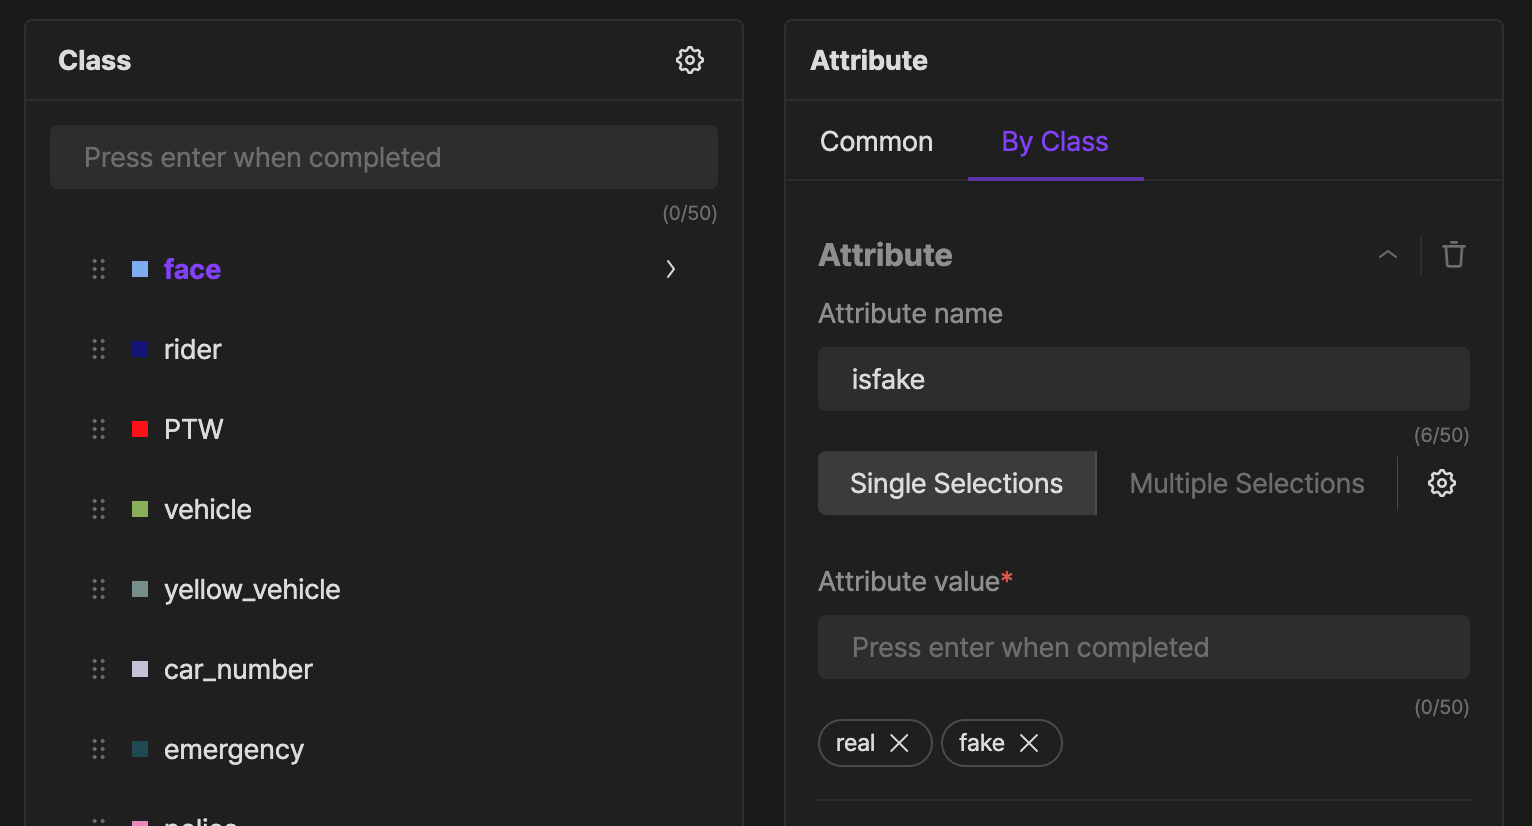
Single selective type
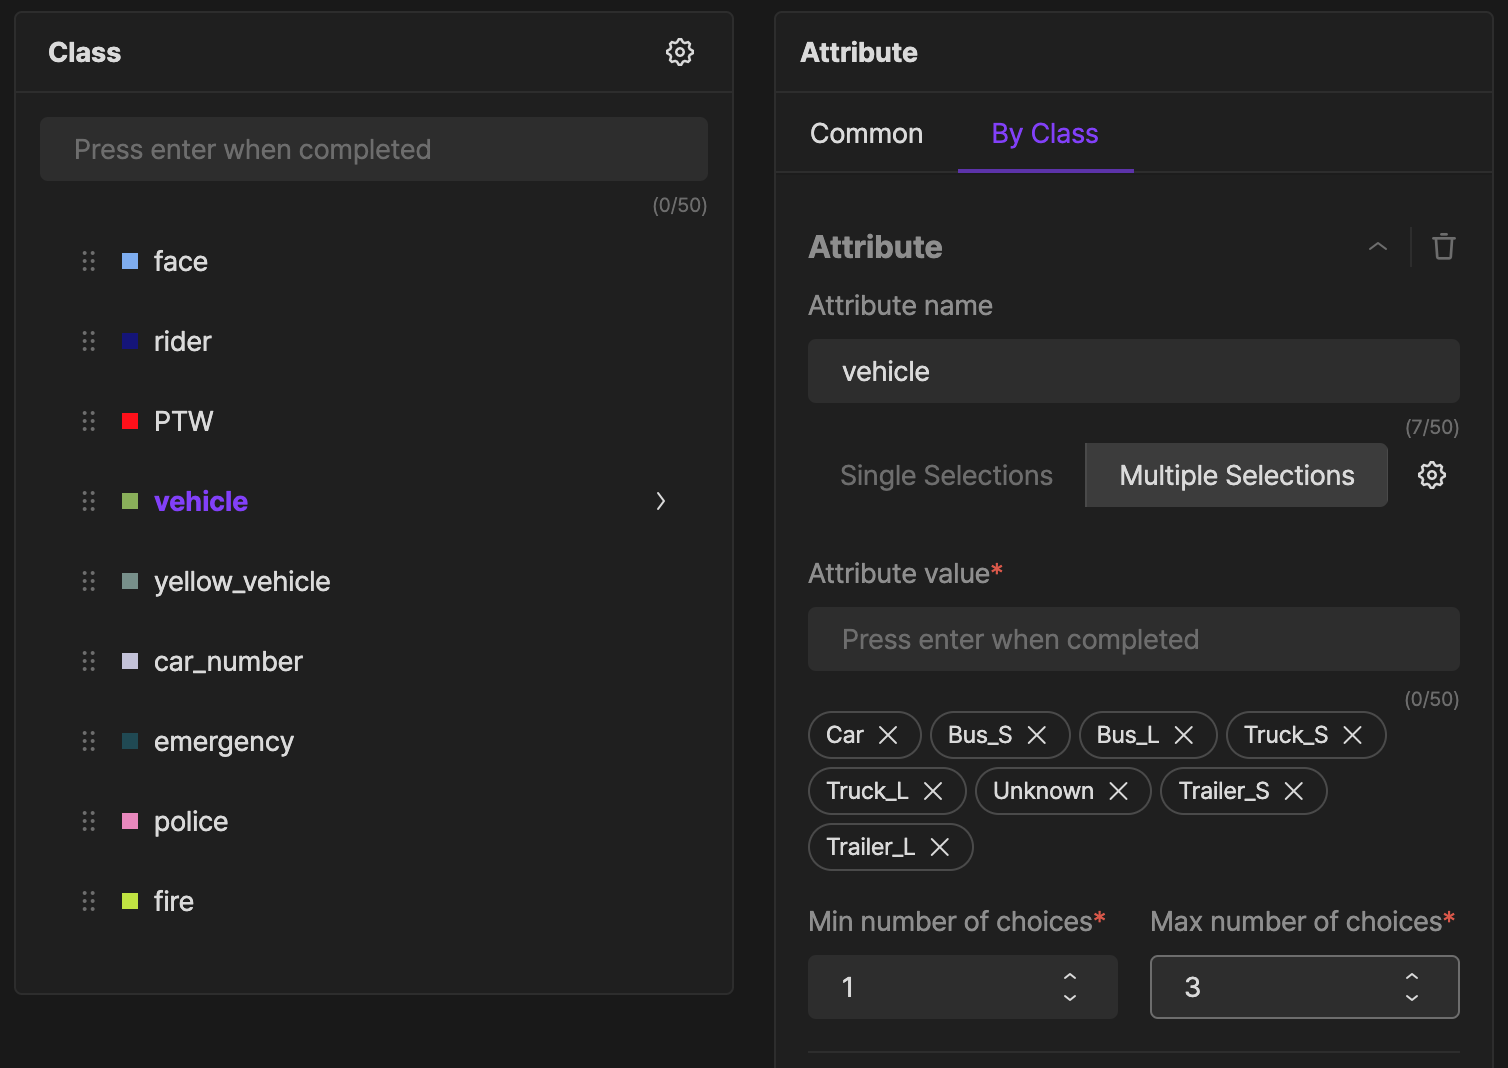
Multi-selective type
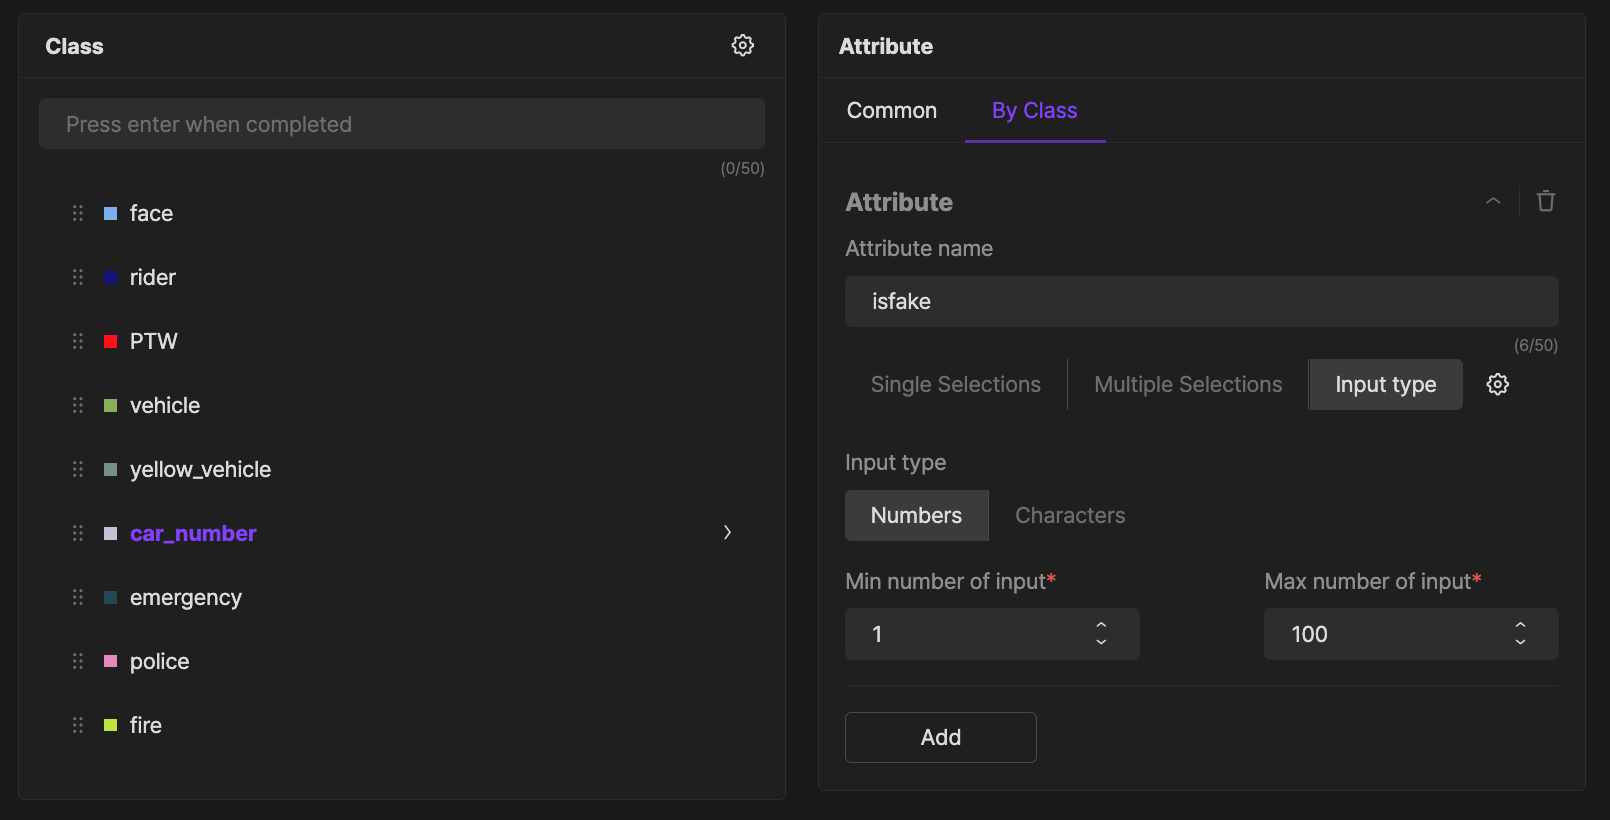
Entering type
Detailed attribute settings
By clicking the ‘Set Attributes’ button, it is available to check the detailed attribute settings window. The items that can be set will be changed depending on the input method.
-
Single selective type
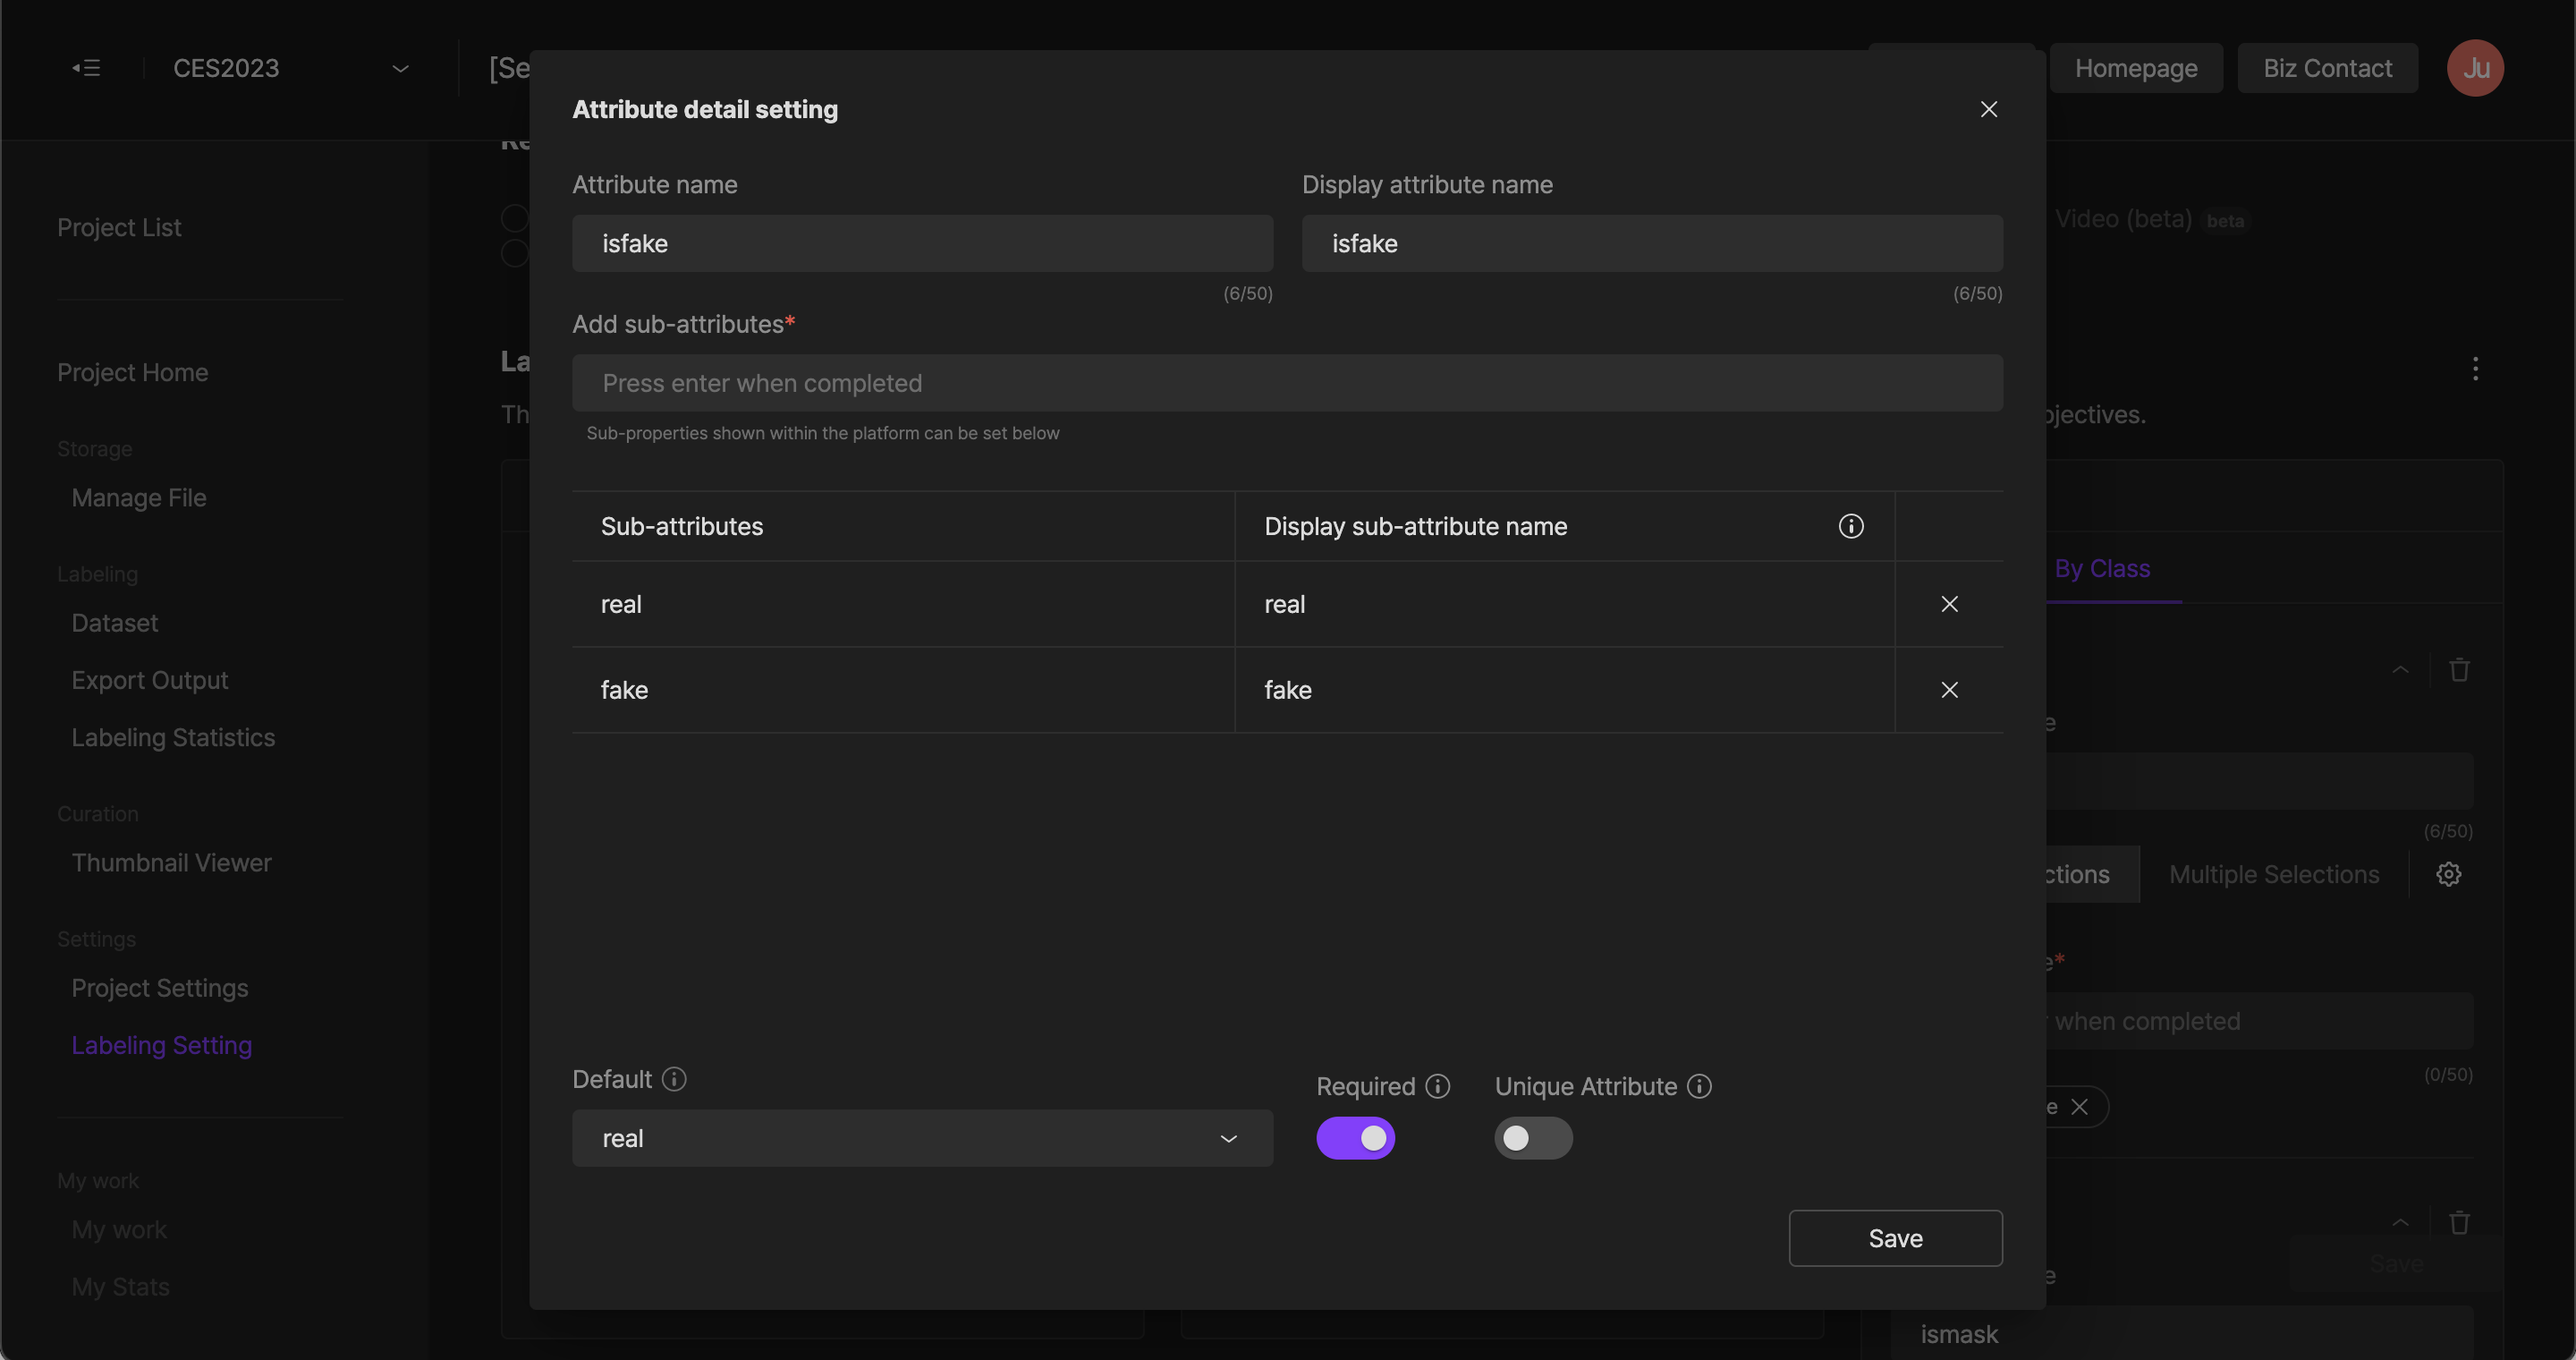
Attribute name, attribute name to be marked, add subattribute values (subattribute name, subattribute name to be marked), default optional attributes, required settings, original attribute settings- Recalling sub-attribute value metadata : the key is a setting that indicates the location of the data in the metadata.
This is a function that is used when sub-attribute values vary by each file. Meta information is registered in the file as a specific key, at this time, it is available to enter that key.
- Recalling sub-attribute value metadata : the key is a setting that indicates the location of the data in the metadata.
-
Multi-selective type
Attribute name, attribute name to be marked, add sub-attribute values (sub-attribute name, sub-attribute name to be displayed), the minimum number of selections, the maximum number of selections, default selection attributes, required settings, original attribute settings -
Entering type
Attribute name, attribute name to be marked, input type, minimum input number (number of characters), maximum input number (number of characters), default selecting attributes, required settings, original attribute settings -
Deleting an attribute
Click the set attributes and then click the trash can button for the attribute you want to delete. Alternatively, click the X button for the attribute you want to delete from the list of attribute values. -
Setting an attribute default value and whether it's required or not
By clicking the ‘set attributes’, select the attribute you want to set as the default value from the default list. When there is no default value selected, no attribute value will be selected by default after selecting the class.
If you set the required toggle button as on, that attribute may be entered necessarily. -
Set whether to maintain the original attribute of not
Among project types, it is the feature that only applies to Object Tracking. If you set the toggle button of original attributes is set to on, when moving to the next file in the studio, it makes the selected attributes to be retained.
Single selective type
Multi-selective type
Entering type
Recall setting values
It is available to load settings (task types, classes, attributes) for the same project type within the workspace. By clicking ‘load settings’, select a project to load setting values, and then click ‘load’.
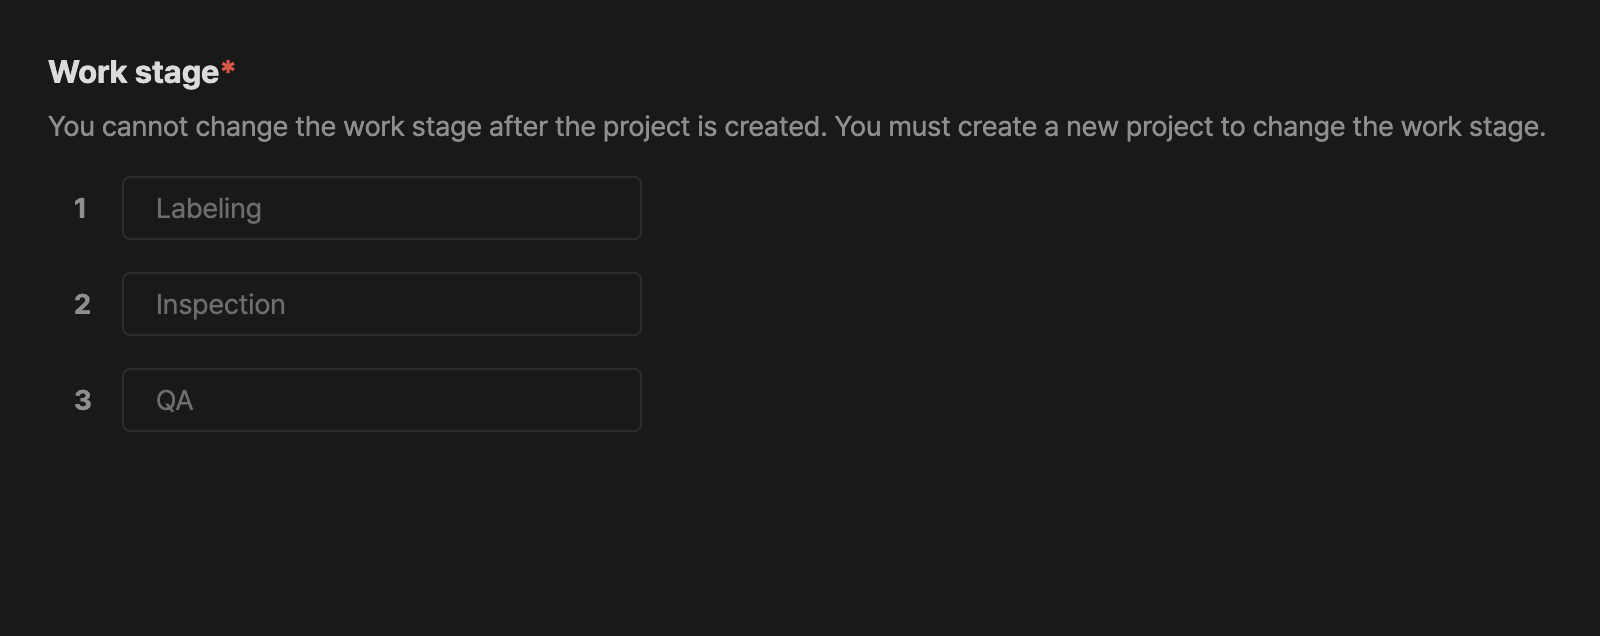
Task stage
It is available to check the task stage that is set when creating the project. It cannot be modified.
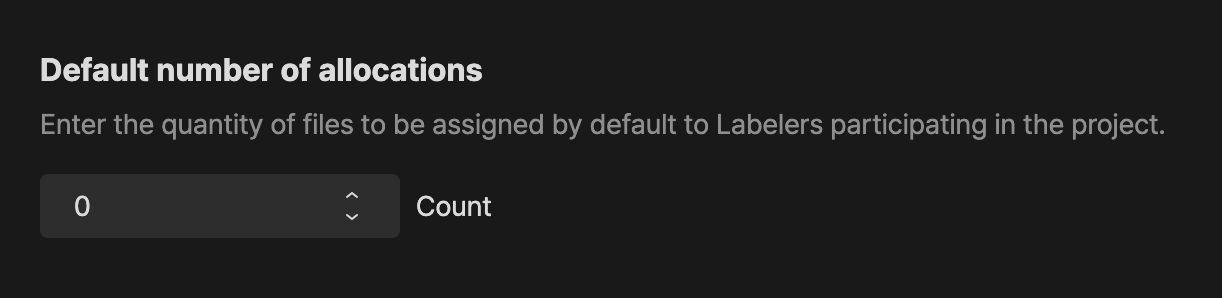
The default number of allocations
Set the default number of files allocated to participating members in the project.
If you set it to 10, participating members are assigned 10 immediately after the participation and it is available to start labeling data.
Setting automatic allocation
If a participating member in a project completes the data labeling of the allocated file, through the data addition request function. it can be automatically allocated to the additional file. At this time, set up to members of the designated range so that it is available to receive automatic allocations.
- Automatically allocating to the designated worker: Only members who are designated by the project manager are available to get automatic allocations. It is available to set the members, who receive automatic allocations, in the dataset.
- Automatically allocating to all workers: All the participating members in the project are available to receive automatic allocations. Members are available to request additional data immediately after completing the labeling task of the allocated file, and it is available to receive automatic allocations for the number designated by the project Manager.

If you have any other inquiries, please get in touch with us at [email protected]
Updated about 1 year ago